Common Deadlift Faults & How to Fix Them
The technique errors that kill your deadlift — diagnosed and fixed.
By Dhiren Dunraj MSc
Key Insight
“The deadlift breaks in specific, predictable ways. Every fault has a cause, every cause has a fix, and every fix addresses the root of the problem rather than the symptom.”
FINAL FORM's AI reads these faults in real time. This article gives you the same diagnostic framework, so you can read them yourself.
There are patterns in how the deadlift breaks down: specific faults that appear at specific points in the lift, caused by specific errors in setup or execution. Treat this as a diagnostic manual. Identify the fault you're seeing in video, trace it to its cause, and apply the fix and drill. The symptom you see in the mirror is rarely the root of the problem. The root is almost always earlier in the lift: a setup error manifesting three seconds later as a failure position.
Film your sessions. The camera is the only diagnostic tool that shows you what is actually happening, not what your proprioceptive system thinks is happening. Read the video, not the sensation.
Fault 1: Bar Drift
The Fault: Viewed from the side, the bar does not travel in a straight vertical line from floor to lockout. Instead, it traces a curved arc away from the body, typically moving forward off the shins between the floor and the knee, then being pulled back toward the hips at lockout. From the front, the bar may appear to swing outward from the lifter's centreline.
The Cause: Lat disengagement. When the lats are not actively holding the bar close to the body, the arms drift slightly forward and the bar follows. The most common version is a setup where the lats are never engaged at all: the lifter grips the bar and pulls without contracting the upper back. The second version is lats engaged at the start but released under effort. The point at which the pull becomes genuinely difficult is the point at which technique degrades first.
A secondary cause is a bar positioned too far in front of mid-foot at setup. If the starting position is already forward of mid-foot, the bar will drift further as the pull progresses.
The Fix: The cue is "protect your armpits": pull the lats in hard before the bar leaves the floor and maintain that contraction to lockout. Imagine you're trying to keep something tucked under each armpit throughout the entire pull. The sensation is the upper arms being pressed inward against the torso, the lats contracting like a seatbelt tightening.
Also check bar starting position. Stand with the bar over mid-foot before the setup begins. Verify from the side.
The Drill: Barbell row to deadlift. Set up in your deadlift position. Before pulling from the floor, perform a single-rep bent-over row: pull the bar off the floor to your lower abdomen and lower it back. Immediately transition to the pull. The row forces the lat engagement that should have preceded the deadlift. It teaches the sensation of "bar close to body under lat contraction" immediately before the lift. After several sessions pairing this drill with deadlifts, the lat engagement becomes part of the setup rather than an afterthought.
Fault 2: Hips Shooting Up at the Start
The Fault: The pull begins and the hips rise faster than the bar. By the time the bar breaks the floor, the hips are already significantly higher than at the setup position. The back angle has become dramatically more horizontal and the load has shifted from the legs to the lower back. Viewed from the side, the lifter's back becomes more parallel to the floor as the bar attempts to leave the ground. This looks like the deadlift converting into a Romanian deadlift in the first tenth of a second of the pull.
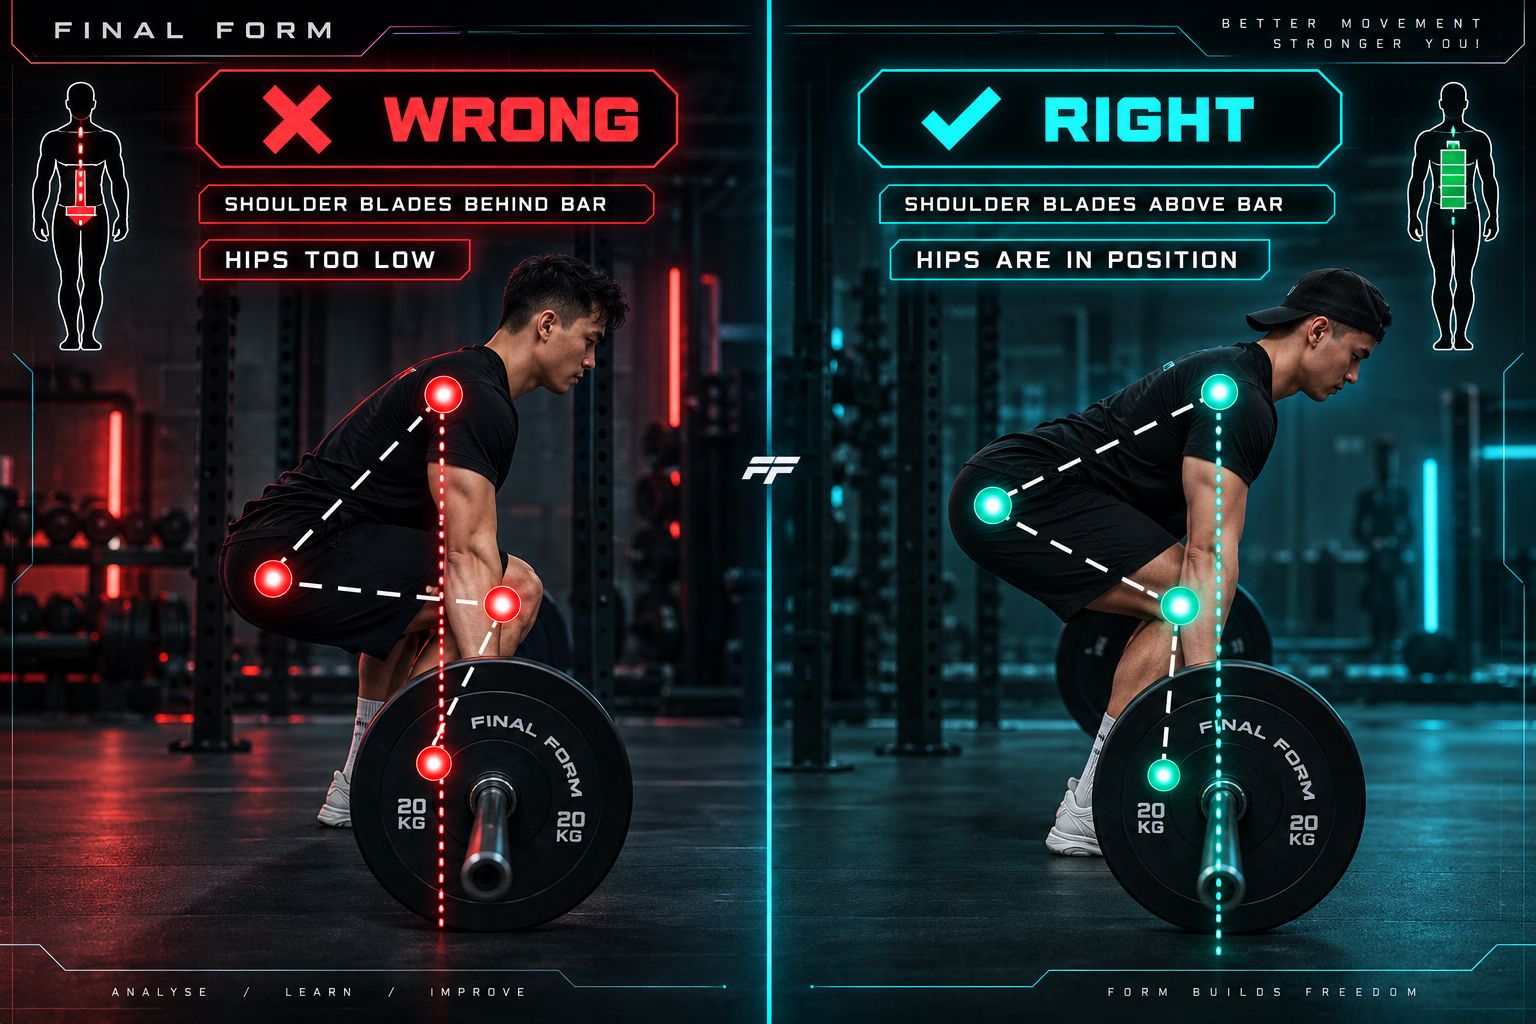
The Cause: A squat-style setup. When the hips are set too low at the start (knees too bent, shins too vertical, hips below the bar), the body is in a position it cannot sustain when force is applied. The legs cannot extend efficiently from this position, so the hips rise to find the correct hip angle before the bar can move. The legs effectively "stand up" before the pull begins, abandoning the bar.
Less commonly, the lifter consciously leads with the hips (a coaching cue they've misapplied) or applies the initial drive through the lower back rather than the legs.
The Fix: Set up the hinge, not the squat. Review the hip height: shoulder blades must be directly over the bar. Hips should be above the knees but below the shoulders. The hamstrings should feel pre-tensioned at the setup. If the setup feels like sitting in a chair, the hips are too low.
The drive cue is "push the floor away while keeping your hips still," not "stand up" or "lift the bar." Push the floor downward while maintaining the back angle. The bar rises as a consequence. The hips don't move until the bar is at mid-shin level. At that point, hip extension naturally occurs as the legs approach full extension.
The Drill: Pause deadlift: pause at 2cm off the floor. Set up, pull the slack out, then drive just enough to break the floor by 2cm. Hold for two seconds. The pause at 2cm makes hips shooting up immediately obvious. If the hips have risen, the position will feel unstable and wrong. It forces the lifter to apply drive with the legs while maintaining the back angle, because the pause exposes any premature hip rise in real time. Practise this at 60–70% of working weight for three sets of three.
Fault 3: Upper Back Rounding
The Fault: The thoracic spine (the upper and mid-back) rounds under load. The chest collapses toward the floor, the shoulder blades wing outward rather than being set, and the bar path is forced forward as the body curls over it. Viewed from the side, the upper back has a visible convex curve (kyphotic rounding) that was not present at the start of the lift or is noticeably worse under heavier loads.
The Cause: Insufficient upper back strength relative to the load, or failure to engage the upper back musculature at setup. The upper back (the rhomboids, mid and lower trapezius, and thoracic erectors) must resist the flexion force created by a bar hanging from the arms under heavy load. When this capacity is exceeded, the upper back rounds. A setup where the shoulder blades are not retracted or the lats are not engaged compounds the problem by starting from an already-compromised position.
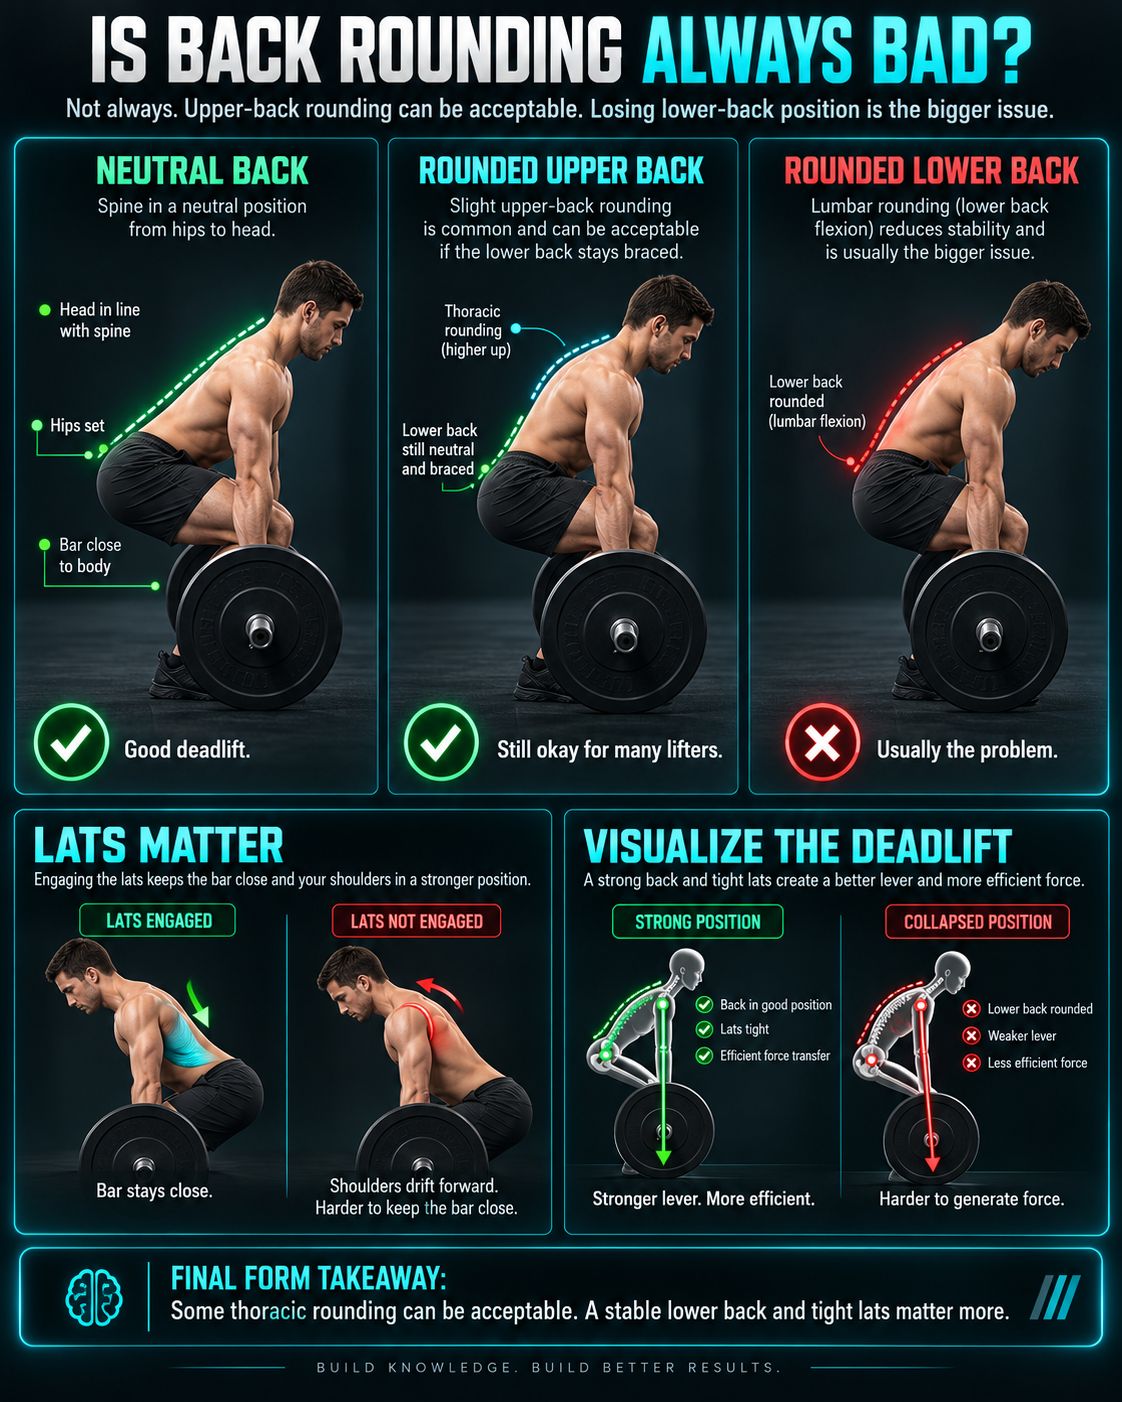
Note: some upper back rounding is acceptable in heavy conventional deadlifts for many lifters. A small amount of thoracic rounding does not carry the same risk as lumbar rounding. The fault becomes significant when the rounding forces the bar forward, changes the bar path, or produces a progressive collapse through the lift.
The Fix: Set the shoulder blades before gripping the bar: retract and depress them, exactly as in the bench press setup. Engage the lats. The setup positions the upper back; the lats maintain it through the pull.
The cue for the pull is "chest up, proud chest." It means the sternum holds its position and does not collapse toward the floor, not that the chest stays vertical. Thinking of "showing your chest to the far wall" produces the correct thoracic extension without forcing an artificial position.
The Drill: Rack pull with a pause at mid-shin. Set up the bar at mid-shin height using blocks or a rack. From this position, the upper back is under maximum demand because the back angle is most horizontal. Practise pulling to mid-shin and pausing there for two seconds before completing the lift. The pause forces the upper back to sustain its position under load at the most demanding angle. Use 70–80% of your deadlift working weight for sets of three.
Fault 4: Lower Back Rounding
The Fault: The lumbar spine flexes under load: the pelvis tilts posteriorly and the lumbar curve flattens or reverses. Viewed from the side, the lower back has a convex rather than concave curve. This is distinct from upper back rounding and must be addressed separately. Lower back rounding is the fault associated with intervertebral disc stress. It's the most biomechanically significant fault in the deadlift.
The Cause: Insufficient lumbar bracing, insufficient hamstring length, or a load that exceeds the lifter's ability to maintain a neutral lumbar spine. The bracing fault is most common: the brace was partial, shallow, or not established before the pull began, and the lumbar spine flexes once load is applied. The hamstring mobility fault is common in beginners. If the hamstrings are tight, the pelvis cannot tilt anteriorly to achieve a neutral lumbar position at the setup angle required by the deadlift.
The Fix: The brace must be complete. 360 degrees. Belly, obliques, and lower back all pressurised simultaneously. The lumbar spine must be in a neutral position (slight anterior curve) before the pull begins, and the brace must maintain that position throughout.
For hamstring length limitations: incorporate Romanian deadlifts and standing hamstring stretches into training consistently. The hamstring flexibility required for a correct deadlift setup is achievable for most lifters with dedicated mobility work over several weeks.
The cue: "proud chest, protect your lower back." Thinking of the lower back pressing backward into where a belt would sit (actively pressing the lumbar region outward) produces the correct lumbar position as part of the brace.
The Drill: Romanian deadlift to develop hamstring length and reinforce neutral spine. Set up in your deadlift position with the bar. Perform a hinge: push the hips back, allow the bar to descend along the legs to the point where the lower back is at the edge of its neutral range, then return. The Romanian deadlift trains the specific combination of hip hinge mobility and lumbar neutral that the deadlift demands, at a lower load and with more conscious control. Three sets of eight at 40–50% of your deadlift working weight, twice per week for four weeks, produces a measurable improvement in hip hinge range and lumbar position under load.
Fault 5: Hyperextension at Lockout
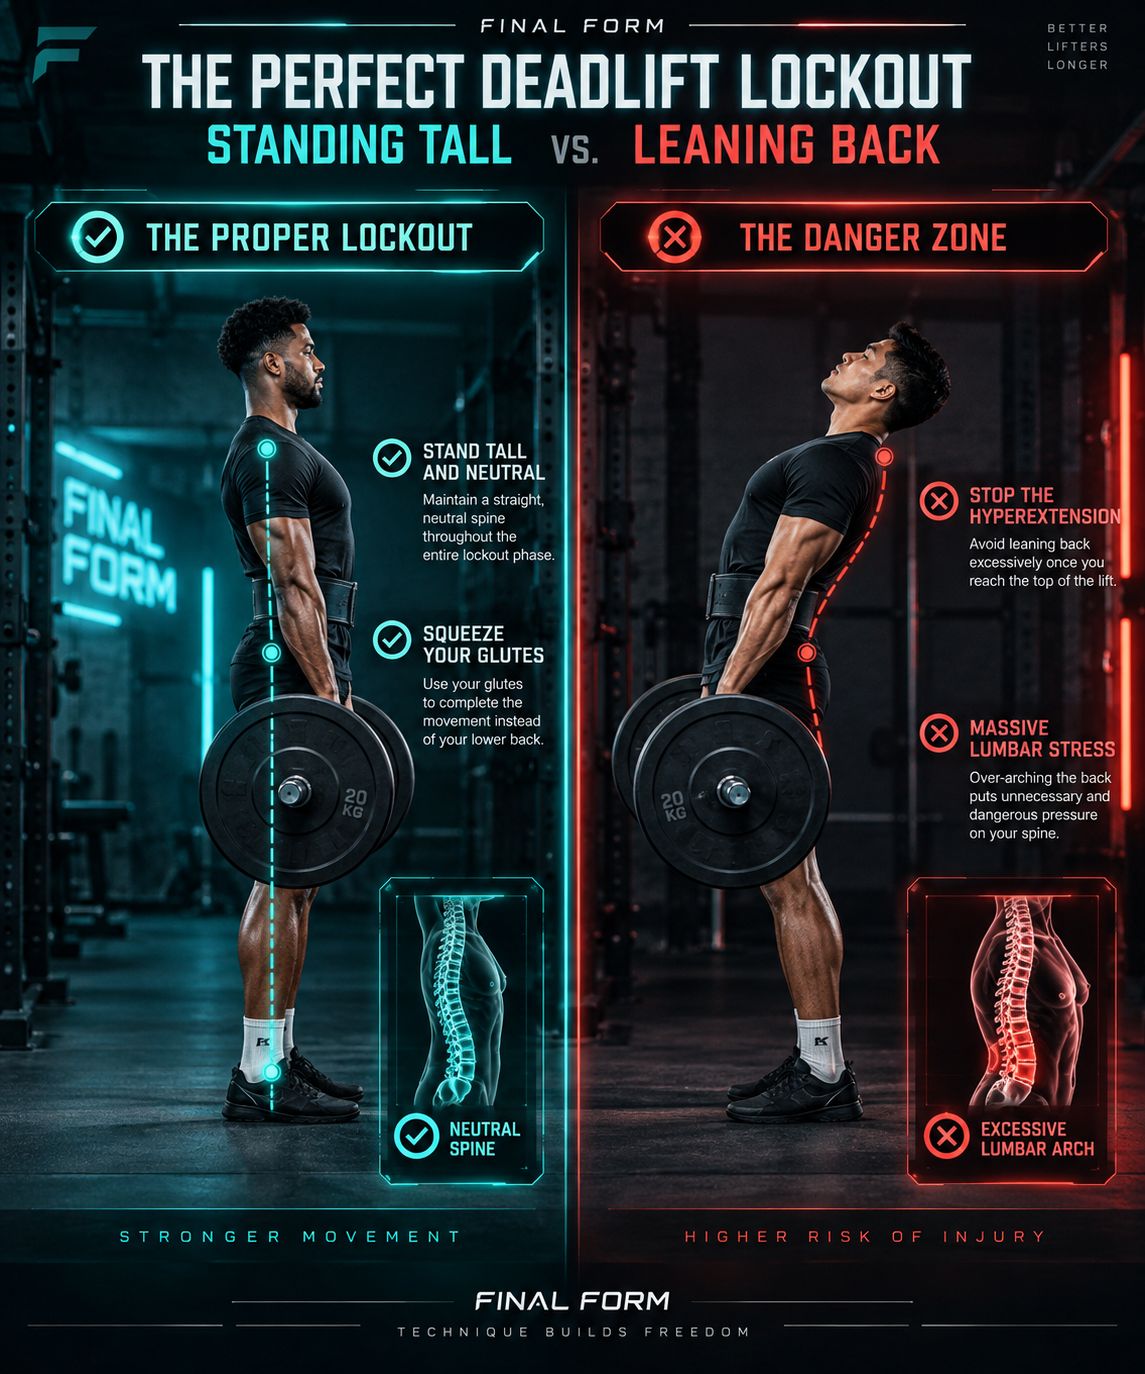
The Fault: At the top of the lift, the lifter snaps into lumbar hyperextension: the lower back bends significantly backward, the hips push forward past neutral, and the torso leans back. This is often paired with the head going back and the chest lifting excessively. It's an overcorrection. The lower back is compressed into extension under the full load of the bar.
The Cause: Overcorrection from cues like "chest up," "stand tall," or "lean back at the top." These cues, applied by a lifter who interprets them as instructions to bend the spine backward rather than achieve full hip extension, produce hyperextension.
This pattern also appears in lifters compensating for incomplete hip extension. The hips are not fully extended because the glutes are not contracting fully, so the back bends backward to simulate the appearance of standing upright.
The Fix: Lockout is standing, not leaning. The cue is "drive the hips through," not "lean back." The hips move forward to meet the neutral standing position. The spine stays neutral throughout. At lockout, the hips should be fully open, the glutes contracted, the knees locked, and the torso vertical, not angled backward.
A useful secondary cue: "squeeze your glutes hard at the top." The glutes are the primary hip extensors. Consciously squeezing them at lockout drives the hips forward to full extension without requiring the back to compensate. If the glutes are doing their job, the back does not need to arch.
The Drill: Hip thrust with deliberate neutral spine. The hip thrust is the best supplemental exercise for developing the glute strength and coordination for a correct deadlift lockout. Set up with the upper back on a bench, feet flat, bar across the hips. Drive the hips upward to full extension. The goal position is a flat line from knees to shoulders, not hyperextension. Practise squeezing the glutes hard at the top while maintaining a neutral or slightly posteriorly tilted pelvis. This specific coordination, glutes driving hip extension without lumbar hyperextension, transfers directly to a correct deadlift lockout.
Fault 6: Hitching
The Fault: During the pull, the bar comes to rest on the thighs, typically anywhere from mid-thigh to just above the knee, and the lifter uses the leg as a support ledge. The lifter pauses the pull momentarily before completing it with the bar sliding up the thigh. The fault is often subtle, particularly when executed on a single rep: a brief softening of the pull, a settling of the bar onto the thigh, then a continuation. It's most visible in heavy singles where the lockout is genuinely difficult.
The Cause: Two primary causes. First: insufficient hip extension strength. The glutes and hamstrings are not producing enough force to complete the lockout without the bar resting on the thigh as a mechanical assist. Second: an incorrect lockout position. The bar is not travelling close enough to the body, and when it reaches the thigh it settles there rather than passing cleanly by. Hitching is also a learned compensation in lifters who have repeatedly trained near their maximum without addressing the true limiting factor.
The Fix: Strengthen the lockout. The top portion of the deadlift, from knee to standing, is a hip extension movement. The exercises that develop this specific capacity are hip thrusts, Romanian deadlifts, and rack pulls from just below the knee. Combining these with deliberate practice of the lockout position, driving the hips through cleanly without bar contact on the thigh, addresses both the strength and the pattern.
The Drill: Rack pull from just below the knee. Set the bar at approximately 2cm below the knee joint using blocks or a rack. Pull from this position to lockout. The partial range forces the lockout to be developed in isolation. The lifter cannot rely on the momentum from the floor pull. Use weights at or slightly above their full deadlift working weight. Three sets of three, focused on driving the hips through cleanly without bar contact on the thigh.
Fault 7: Soft Knees at Lockout
The Fault: At the top of the lift, the knees are not fully locked. They remain slightly bent. This is often paired with incomplete hip extension. The lifter appears to be standing upright but is not fully locked out. Soft knees mean an incomplete lift. They also frequently indicate that the lifter has stopped driving before the movement is complete. The last 5% of the lockout is taken for granted.
The Cause: Incomplete drive to the top of the movement. This is partly a habit: the lifter reaches a "good enough" position and considers the rep finished before the body is truly locked. It's also partly a coaching cue problem: "pull to the hips" or "drive the bar up" rather than "stand completely upright and lock every joint." A secondary cause is insufficient quad and glute strength to complete the full range without a sticking point making the lockout feel optional.
The Fix: The cue is "stand completely upright: knees locked, hips locked." There is no "almost locked out." Either every joint is extended fully, or the rep is not complete. Treat the lockout as a position to own, not a waypoint to pass through.
The Drill: Pause at lockout. On every rep in the next four weeks of training, hold lockout for a deliberate two-second pause. Knees locked. Hips locked. Glutes contracted. Shoulders back. Own the position consciously before initiating the lowering. The pause builds the habit of treating lockout as a position rather than the top of a range of motion to touch and reverse.
Fault 8: Grip Failure
The Fault: The bar rotates in the hands during the pull, typically in the final third of the lift as fatigue accumulates, or the grip releases before lockout. The bar slips from the fingertips. In double overhand grip, this presents as the bar rotating forward out of the hands. In mixed grip, the supinated hand typically fails first, with the bar rotating inward. Hook grip failure is less common once the technique is established.
The Cause: Two distinct causes. First: the bar is being gripped with the fingertips rather than the palm. The bar should sit in the proximal part of the hand, across the calluses at the base of the fingers, not rolled out to the fingertips. A fingertip grip has far less mechanical advantage and fatigues quickly. Second: genuine grip strength insufficiency. The forearm muscles are not strong enough to hold the bar at the required load. Both causes are addressable, but they require different solutions.
The Fix: For grip position: take the grip with the bar as deep in the hand as possible, across the base of the fingers, palm engaged. Squeeze hard. The knuckles should be white. The sensation of the bar sitting in the palm is different from the sensation of it sitting in the fingers. Learn to distinguish them.
For grip strength: train grip directly. Farmer's carries, barbell holds (holding the bar at the top of a deadlift for time), and double-overhand deadlifts without straps until grip becomes the limiting factor, then stop and rest before adding load. Using straps on every set removes the training stimulus for grip. Train the grip, then use straps on final sets if needed.
The Drill: Barbell hold at lockout: 30-second timed holds. After your last deadlift set, hold the bar at lockout in double overhand for 30 seconds. The bar will be heavy relative to your grip endurance. Focus on keeping the bar deep in the palm, squeezing hard, and not allowing it to roll toward the fingertips. Three sets of 30 seconds, twice per week, with progressive loading. Grip strength develops relatively quickly with this kind of specific overload. Most lifters see significant improvement within four to six weeks.
Key Takeaways
- Bar drift is a lat problem. "Protect your armpits" from floor to lockout, every rep without exception
- Hips shooting up signals a squat-style setup. Move the hips higher in the setup so the shoulder blades are over the bar and the hamstrings are pre-tensioned
- Upper back rounding and lower back rounding are different faults with different causes. Diagnose them separately and address them separately
- Lower back rounding is the most biomechanically significant fault. It converts compressive spinal load to shear load and requires a complete brace before the pull begins
- Hitching, soft knees, and hyperextension all indicate that the lockout is undertrained. Rack pulls and hip thrusts address the top portion of the lift specifically
- Grip failure has two causes: bar position in the hand (fixable immediately) and grip strength insufficiency (fixable over weeks with direct grip training)
Put It Into Practice
This week: Film three sets from the side and identify one fault from this list that appears consistently. Don't try to fix all eight simultaneously. Identify the one that appears most often and is earliest in the movement chain. Fix the root, not the symptom.
This training block: For whichever fault you identify, apply the prescribed drill for four weeks before reassessing. Technique change takes repetition, not a single cue in a single session. Give the nervous system enough rehearsals to make the new pattern automatic.
Long term: Revisit this diagnostic framework every three months. Faults that have been resolved can re-emerge under heavier loads. Technique degrades at the frontier of your strength. Systematic video review and honest assessment is a permanent practice, not a beginner's task.
Analysed by FINAL FORM AI. Your form, perfected.
References
- 1Escamilla RF, Francisco AC, Fleisig GS, et al.. 'A three-dimensional biomechanical analysis of sumo and conventional style deadlifts.' Med Sci Sports Exerc. 2000. PMID: 10912892
- 2Escamilla RF, Francisco AC, Kayes AV, et al.. 'An electromyographic analysis of sumo and conventional style deadlifts.' Med Sci Sports Exerc. 2002. PMID: 11932579
- 3Swinton PA, Stewart A, Agouris I, et al.. 'A biomechanical analysis of straight and hexagonal barbell deadlifts using submaximal loads.' J Strength Cond Res. 2011. PMID: 21659894
- 4Hales ME, Johnson BF, Johnson JT. 'Kinematic analysis of the powerlifting style squat and the conventional deadlift during competition: is there a cross-over effect between lifts?' J Strength Cond Res. 2009. PMID: 19910816
- 5Cholewicki J, McGill SM, Norman RW. 'Lumbar spine loads during the lifting of extremely heavy weights.' Med Sci Sports Exerc. 1991. PMID: 1758295