Bench Press Technique Essentials: The Whole-Body Skill
The bench press is not an upper body exercise. It is a full-body skill.
By Dhiren Dunraj MSc

Key Insight
“Most people think the bench press is a chest exercise. Lifters who bench 200kg know it's a whole-body skill, and the chest is not even the limiting factor for most of them.”
Most people think the bench press is a chest exercise. Lifters who bench 200kg know it's a whole-body skill, and the chest is not even the limiting factor for most of them. The limiting factor is usually the setup: the arch, the leg drive, the bar path, the pause. Every one of these elements can be understood, refined, and optimised. None of them are advanced secrets reserved for elite athletes. They're the technique, the actual mechanics of how the bench press works, and they're available to any lifter willing to study and apply them.
This article goes beyond the basics. If you've already read the beginner's guide and grooved the fundamental movement, this is where your technique gets serious.
Arch Mechanics: Why It Exists and What It Actually Does
The arch in the bench press is the most misunderstood element in the lift. Critics call it cheating. Informed lifters call it physics. Let's settle it.
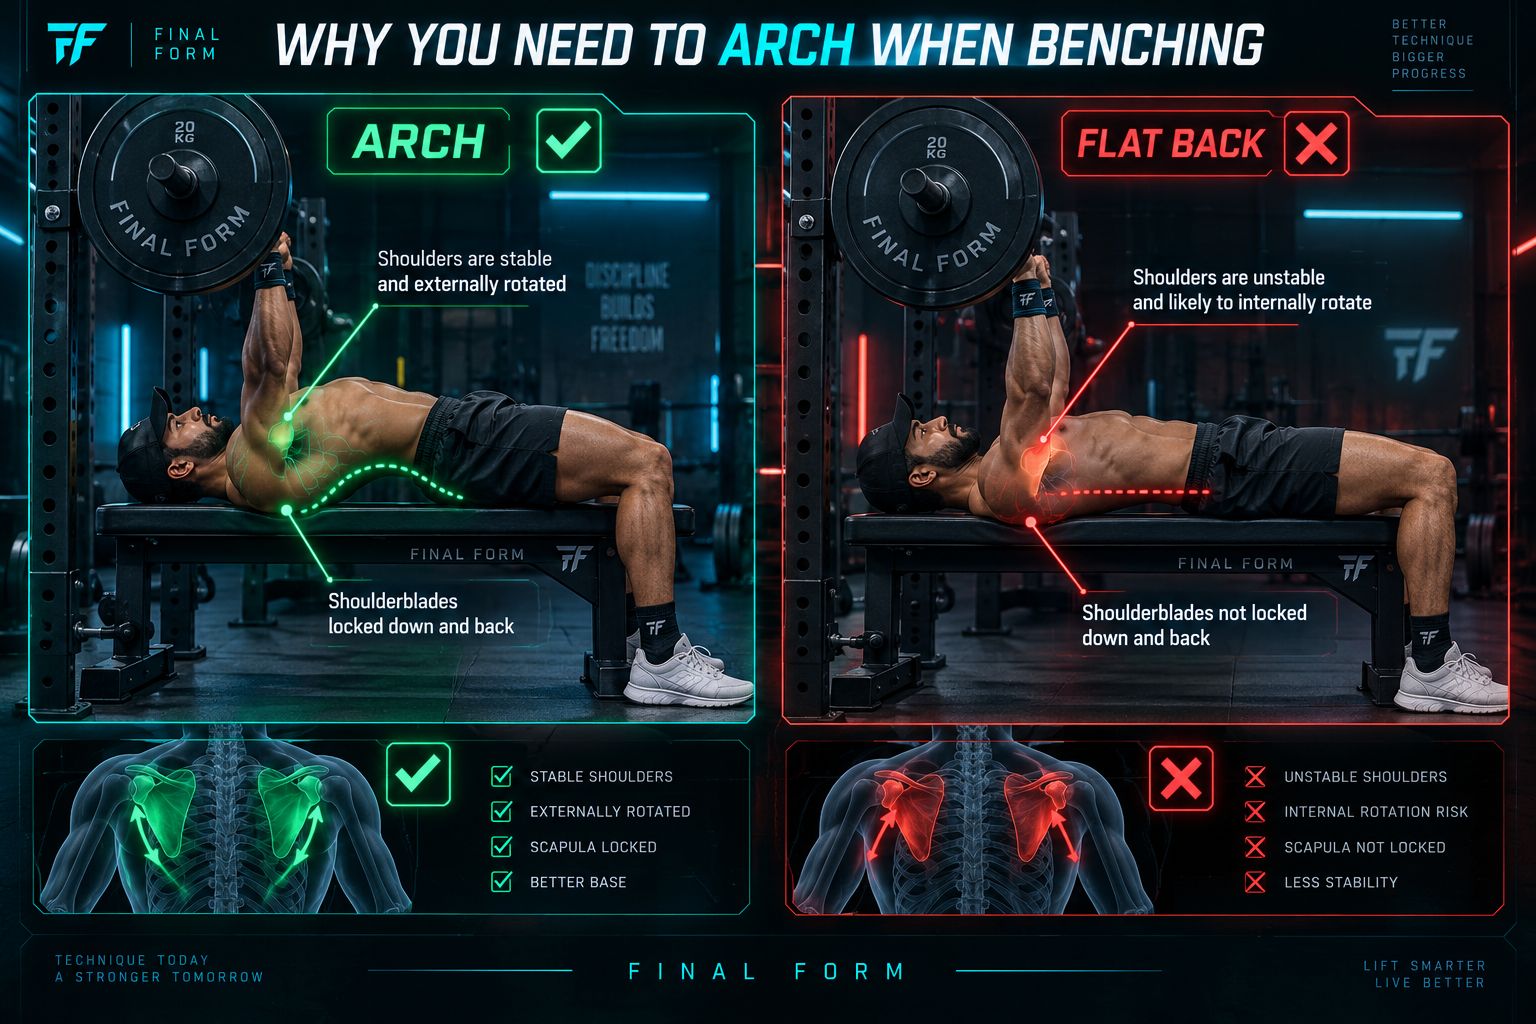
The arch exists because of three mechanical realities. First: reduced range of motion. When you arch your thoracic spine and elevate your chest off the bench, the distance the bar has to travel from lockout to touch-point shortens. Less distance under a given load means less total mechanical work. Less work with the same force means more weight can be moved. It's an energy equation.
Second: improved shoulder positioning. When your chest is elevated toward the bar, rather than the bar having to descend all the way to a flat chest, the shoulder joint is in a less compromised position at the bottom of the lift. The humeral head sits more centrally in the glenoid. The rotator cuff is under less stress. Try benching with a deliberately flattened back and notice how the shoulder joint feels at the bottom. The difference is immediate.
Third: a better force base. An arched position creates a stable, elevated shelf across the upper back that provides a rigid foundation for force transfer. The bar has something solid to push against through the entire system, from chest through back through bench through body through feet through floor.
Thoracic extension versus lumbar hyperextension. These are different things, and confusing them produces injury.
Thoracic extension (the upper spine extending, the mid-back arching) is where the bench press arch should come from. Thoracic mobility training and foam roller extensions build it. Thoracic extension elevates the chest, shortens the bar path, and positions the shoulder joint optimally.
Lumbar hyperextension (forcing the lower back into an exaggerated bridge position) is different. It can produce a visually dramatic arch, but if it's coming primarily from the lower lumbar spine rather than from thoracic mobility, it creates excessive lumbar stress and does not produce the same shoulder-positioning benefits. The arch that matters is the one across your mid-back, not an extreme lower-back bridge.
Build the arch from thoracic mobility. This takes weeks to months of consistent mobility work. It cannot be forced in a single session. A lifter with limited thoracic mobility should not try to arch aggressively. They should build the mobility first, and the arch will develop naturally.
Foot Position and Leg Drive: The Closed Kinetic Chain
Here is the chain of tension that makes leg drive work. Your foot connects to the floor. The floor is rigid and immovable. Your leg connects to your foot. Your hip connects to your leg. Your torso connects to your hip. Your upper back connects to the bench through your torso. Your pressing muscles connect to your torso. The bar connects to your hands.
When every link in that chain is under tension and your foot drives into the floor, the force travels upward through the chain and contributes to the press. This is closed kinetic chain mechanics. Olympic lifters use this principle when they drive through their legs at the top of a clean. Sprinters use it every step. You use it every time your feet are planted and you press a heavy bar.
Feet flat on the floor create the most stable, complete version of this chain. Maximum foot contact, maximum force transfer.
The practical execution requires attention. As you press, drive your heels into the floor. Feel your glutes contract. Feel your lower back press slightly harder into the arch position. That force is travelling up the chain. Your glutes must not, however, leave the bench. The glute drive is into the floor, through the bench, into the bar, not upward into the air.
This takes practice. The cue that works for most lifters: "push the floor away." Not "push your hips up." Not "drive your legs." Push the floor away. The direction of the force is downward into the ground, not upward off the bench. When you feel the difference, you'll understand exactly why elite lifters look planted even when they're pressing maximally.
Foot position variation exists, since some lifters pull the feet back toward the hips while others extend them forward. Both can work, and both have trade-offs in leg drive expression. For intermediate lifters establishing their technique, flat feet roughly hip-width apart is the most reliably stable starting point. Find what connects for you and lock it in.
Grip Width and Its Effects: A Deliberate Choice
Your grip width is a deliberate choice that shifts muscle activation, changes the range of motion, and directly affects shoulder health. Understand what changes when you move your hands.
Wider grip: The bar travels a shorter distance from lockout to touch-point. Pectoral activation is greater, since the wide grip creates a larger horizontal abduction angle at the shoulder, maximally loading the pecs. However, shoulder stress increases. At the bottom of the lift with a wide grip, the shoulder is under significant load in a position of horizontal abduction that the joint does not particularly love. A grip that's too wide compounds this stress and is a reliable route to anterior shoulder pain over time.
Narrower grip: The range of motion increases, meaning the bar has further to travel. Tricep activation increases substantially, as the narrower grip keeps the elbow more directly under the bar throughout the lift. Shoulder stress is reduced because the horizontal abduction angle at the bottom is less extreme. This is why close-grip bench press is recommended for lifters with shoulder issues: the joint is better positioned.
The optimal grip for most intermediate lifters lands somewhere between these extremes. The pinky-on-the-rings starting reference from the beginner guide is just that, a starting point. From there, the adjustment should be guided by two questions: Where do my forearms track most vertically at the bottom position? And where does my shoulder joint feel most comfortable at the bottom of a heavy set?
Shoulder health must inform grip width. If you have existing anterior shoulder impingement or AC joint issues, narrow your grip before widening it. The pectoral activation you sacrifice by narrowing slightly is worth far less than the years of healthy pressing the adjustment protects.
The J-Curve: What the Bar Path Actually Does
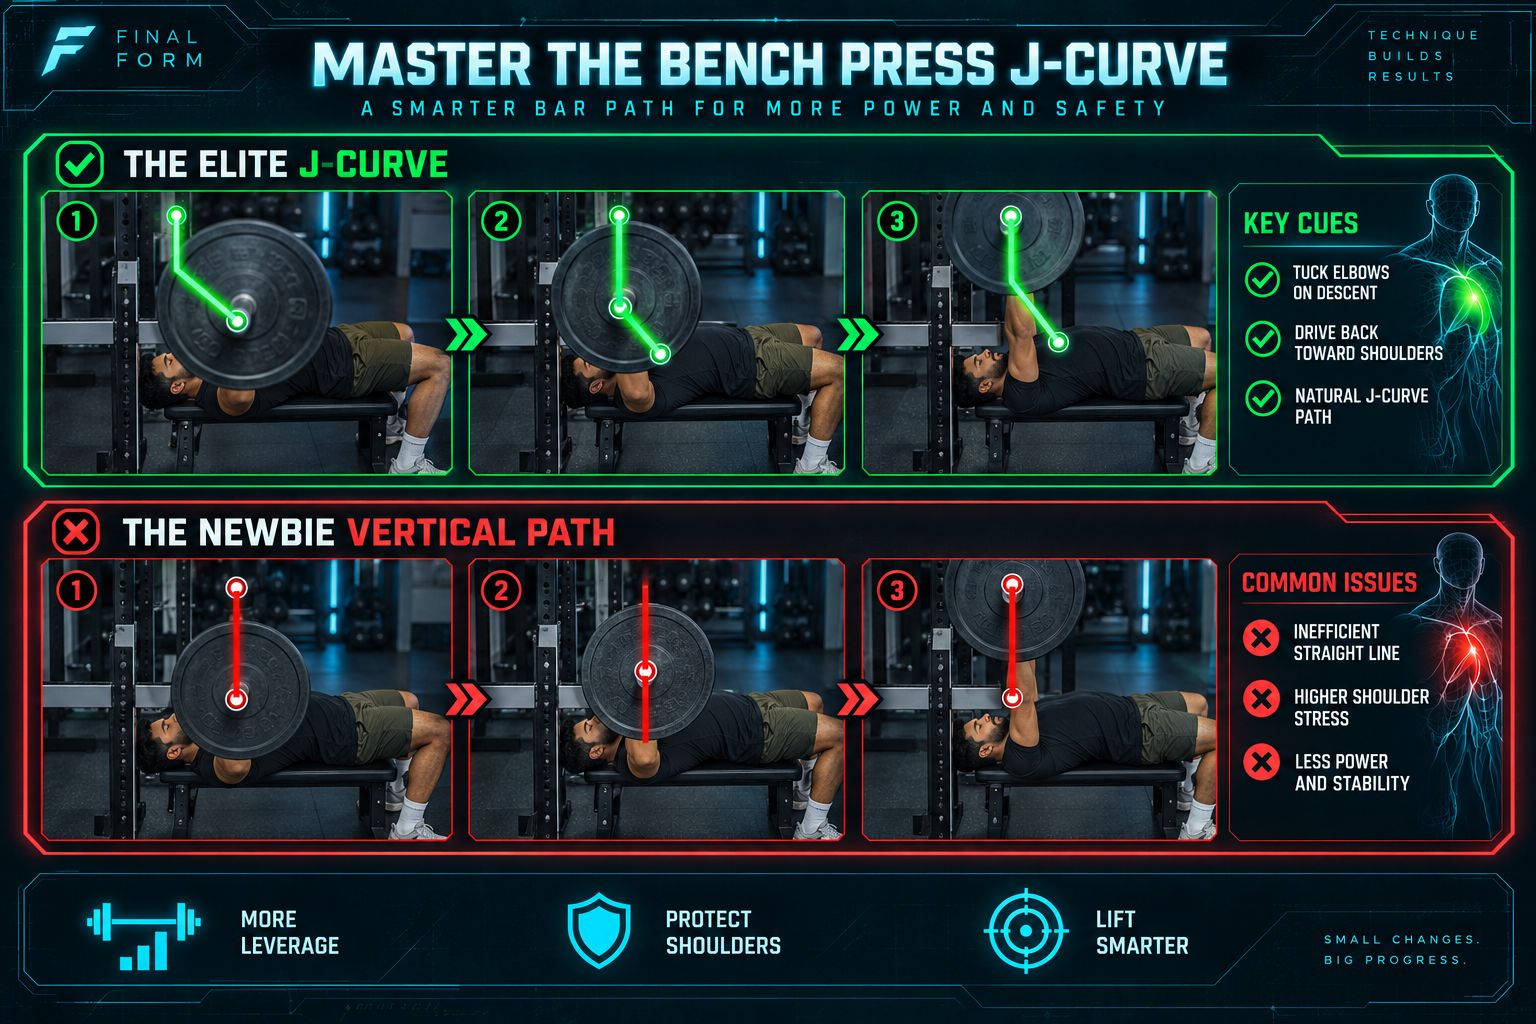
The bar in a bench press does not travel straight up and down. This is one of the most persistent myths in the gym. Film your bench press from the side and trace the bar path. You'll see a slight curve: from the touch point on the lower chest, the bar travels upward and slightly backward toward the rack as it rises. By lockout, the bar is over the shoulder joints, not over the chest [1]. This path is called the J-curve.
The J-curve is the mechanically optimal path for the bench press, and the reason is moment arms.
At lockout, when the bar is directly over the shoulder joint, the moment arm at the shoulder is zero. The perpendicular distance from the shoulder joint to the bar's line of force collapses. The shoulder no longer has to produce force to hold the bar. The skeleton does it. This is what makes the top of a technically correct bench press feel easier than a bar path that stays over the chest at lockout.
When a bar path drifts too far toward the face at lockout (a common fault) the bar is past the shoulder joint, the moment arm reopens, and the shoulder is still under load at what should be the easiest part of the lift. On near-maximum attempts, this path error is frequently the difference between a made lift and a missed one. The last few centimetres of the press become a grinding struggle that correctly-pathed lifters don't experience.
To develop the J-curve, the cue is to engage your lats, not to consciously steer the bar. When your lats are active during the descent, they pull the elbows in and down, guiding the bar naturally toward the lower chest and away from the face. On the ascent, pressing with lat engagement naturally tracks the bar back and up along the J. Lat engagement is the mechanism. The J-curve is the result.
Pause Mechanics: What Stillness Requires
A legal pause is a moment of complete, visible stillness, not a number of seconds. The bar is on the chest. It's not moving. There is no downward pressure from the chest creating a bounce, no wobble from bar oscillation, no subtle creep of the hips or lift of the elbows. The bar is still. You're in control. That moment of stillness is the pause.
That definition changes how you train for it. You cannot train the pause by counting to one and pressing. You train the pause by developing genuine control of the bar at the bottom position: the ability to hold it absolutely still under load, with full brace maintained, before initiating the press.
The strength that produces a controlled pause is bottom-position strength. It's built by practising paused reps at moderate intensity (60 to 75 percent of your working weight) with deliberate focus on stillness. The bar should not move. Your back should not shift. Your feet should not shuffle. Everything that's planted stays planted. The only thing that moves when the pause ends is the bar going up.
Train paused bench year-round, not only in competition preparation blocks. Paused bench at 60 to 75 percent is a technique drill. Paused bench at 80 to 90 percent is a strength expression. Both belong in your programme. The lifter who treats every training bench as a touch-and-go until the month before a competition and then suddenly has to hold a pause under maximum loads has not trained the skill. They've trained something different and hoped it would transfer.
Unracking as a Separate Skill
Most lifters treat the unrack as a formality. It's the first opportunity for your setup to fall apart, and many lifters' shoulder blade position, brace, and arch start deteriorating the moment they begin wrestling the bar from the hooks.
The unrack is a press-out. From your setup position (shoulder blades set, arch established, breath locked) you press the bar straight up and forward, out of the J-hooks. The movement is a short, controlled press in the direction the hooks open, not a lift or a pull, clearing the hooks until the bar is stacked over the shoulder joint at your start position.
Practise this as a standalone movement. Set up on the bench, press the bar out of the hooks, hold it at the start position for two to three seconds, then re-rack it. Feel whether your shoulder blade setup survived the unrack. Feel whether the brace held. If the setup degrades during the unrack, the solution is to practise the unrack slowly until the shoulder blade position is stable regardless of the bar movement.
With a training partner, communicate the unrack protocol before every heavy set. "Ready?" Then: "Ready. Three, two, one." The lifter initiates. The spotter assists with light finger contact under the bar. The moment the bar is over the start position, the spotter steps back. This is a trained routine. Build it from day one and it will serve you when the weights get serious.
Key Takeaways
The arch is a mechanical optimisation. Thoracic extension elevates the chest, reduces range of motion, and protects the shoulder joint. Build it through thoracic mobility, not forced lumbar bridging.
Leg drive is a closed kinetic chain. Every link from foot to bar must be under tension. Drive the floor away; don't lift your glutes.
Grip width shifts muscle activation and shoulder stress. Match grip to your shoulder health and force-production needs, not to habit or aesthetics.
The J-curve is the mechanically optimal bar path. Lats engaged during the descent produces it naturally. The bar should be over the shoulder joint at lockout, not over the face.
The pause is a skill, not a number of seconds. Train it year-round at moderate intensity to develop genuine bottom-position control.
Put It Into Practice
This week: Film your bench press from the side and trace your bar path. Does it curve back toward the rack at lockout? If it drifts toward your face, add the cue "engage your lats on the way down" for one full session and film again.
This training block: Introduce paused bench press at 60 to 70 percent of your working weight for two to three sets of three to five reps per session. Focus on absolute stillness before pressing. Build this as a permanent fixture of your programme.
Long term: Develop your thoracic mobility with consistent daily work: foam roller mid-thoracic extensions, thread-the-needle stretches, a few minutes per day. Your arch will develop over months. The shoulder positioning and mechanical advantages that follow are worth every session of mobility work.
Analysed by FINAL FORM AI. Your form, perfected.
References
- 1Elliott BC, Wilson GJ, Kerr GK. 'A biomechanical analysis of the sticking region in the bench press.' Med Sci Sports Exerc. 1989. PMID: 2779404
- 2van den Tillaar R, Ettema G. 'The "sticking period" in a maximum bench press.' J Sports Sci. 2010. PMID: 20373201
- 3van den Tillaar R, Ettema G. 'A comparison of successful and unsuccessful attempts in maximal bench pressing.' Med Sci Sports Exerc. 2009. PMID: 19812510
- 4Gomo O, van den Tillaar R. 'The effects of grip width on sticking region in bench press.' J Sports Sci. 2016. PMID: 26055260
- 5Lehman GJ. 'The influence of grip width and forearm pronation/supination on upper-body myoelectric activity during the flat bench press.' J Strength Cond Res. 2005. PMID: 16095407
- 6Saeterbakken AH, Mo DA, Scott S, et al.. 'The effects of bench press variations in competitive athletes on muscle activity and performance.' J Hum Kinet. 2017. PMID: 28713459