Elite Bench Techniques: Advanced Strategies for a Bigger Press
The technical patterns of the strongest benchers — and what transfers to your press.
By Dhiren Dunraj MSc
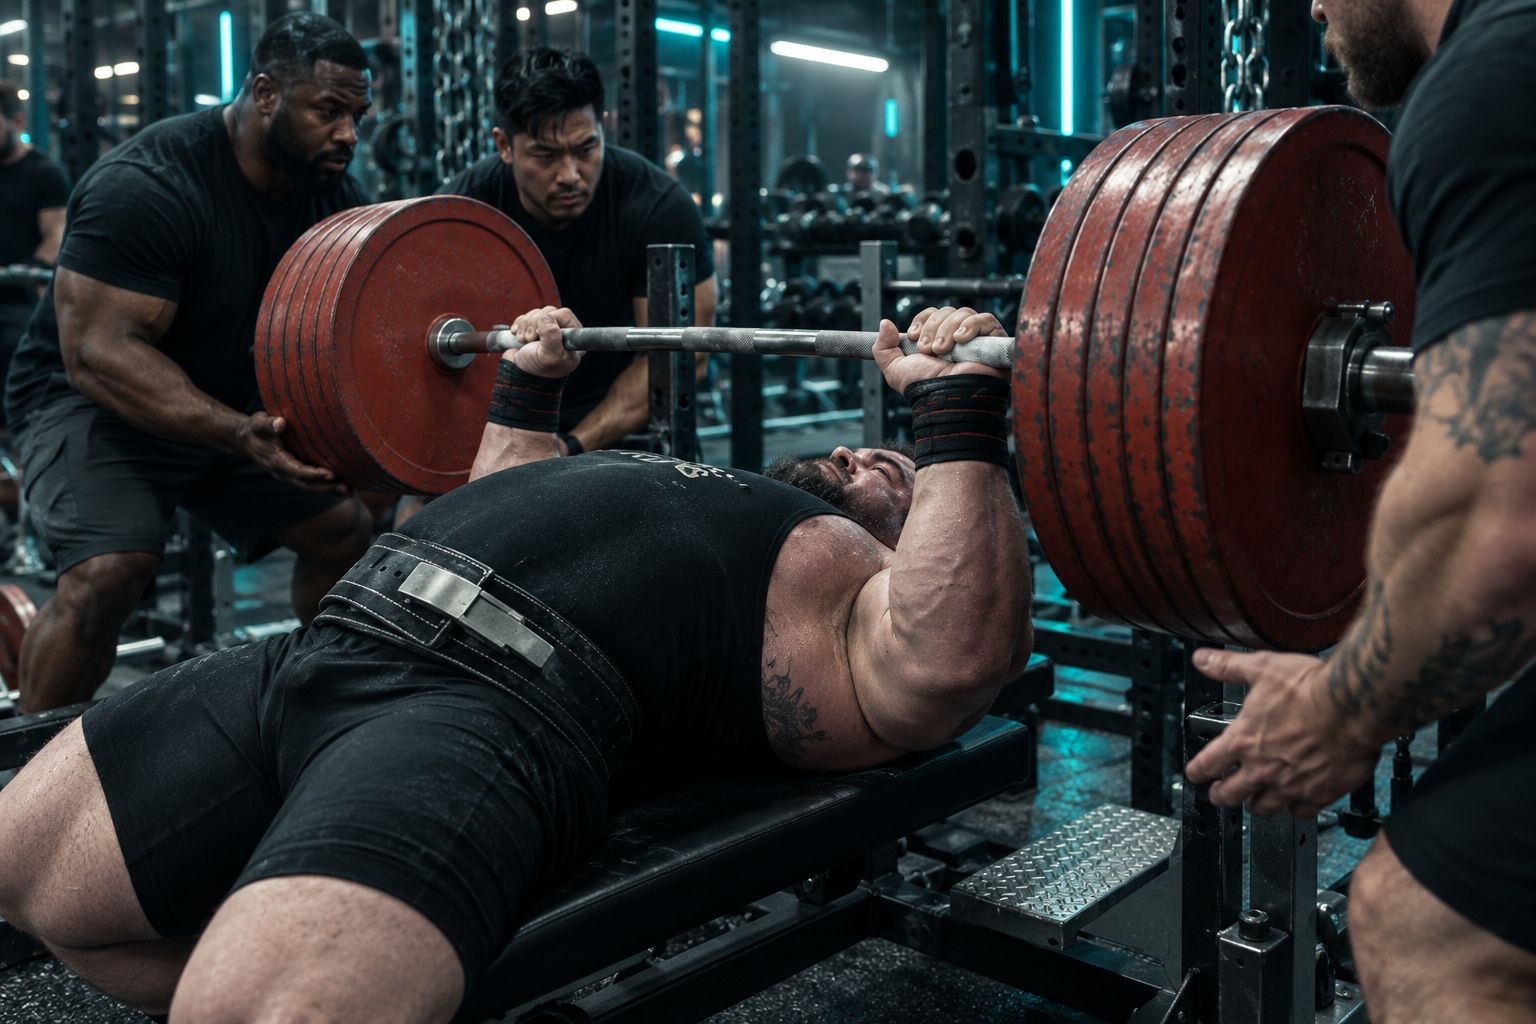
Key Insight
“The difference between a 180kg bench and a 220kg bench is rarely the chest. It's the system, every element refined, nothing left to chance.”
The lifter pressing 220kg has not found a secret that the 180kg lifter hasn't. They have built a more complete system (setup, arch, leg drive, pause, bar path, mental preparation) piece by piece, over years, and each piece amplifies every other.
This article is for the lifter who already has good technique and is ready to make it elite, not for beginners or intermediate lifters still grooving the fundamental movement. It assumes you understand what a correct bench press looks like and are now ready to optimise every variable in the system.
Advanced Arch Development: A Long Game
The arch that elite bench pressers display did not appear in a session. It was built over months, sometimes years, of consistent thoracic mobility work, and it developed because the lifter understood what they were building and why.
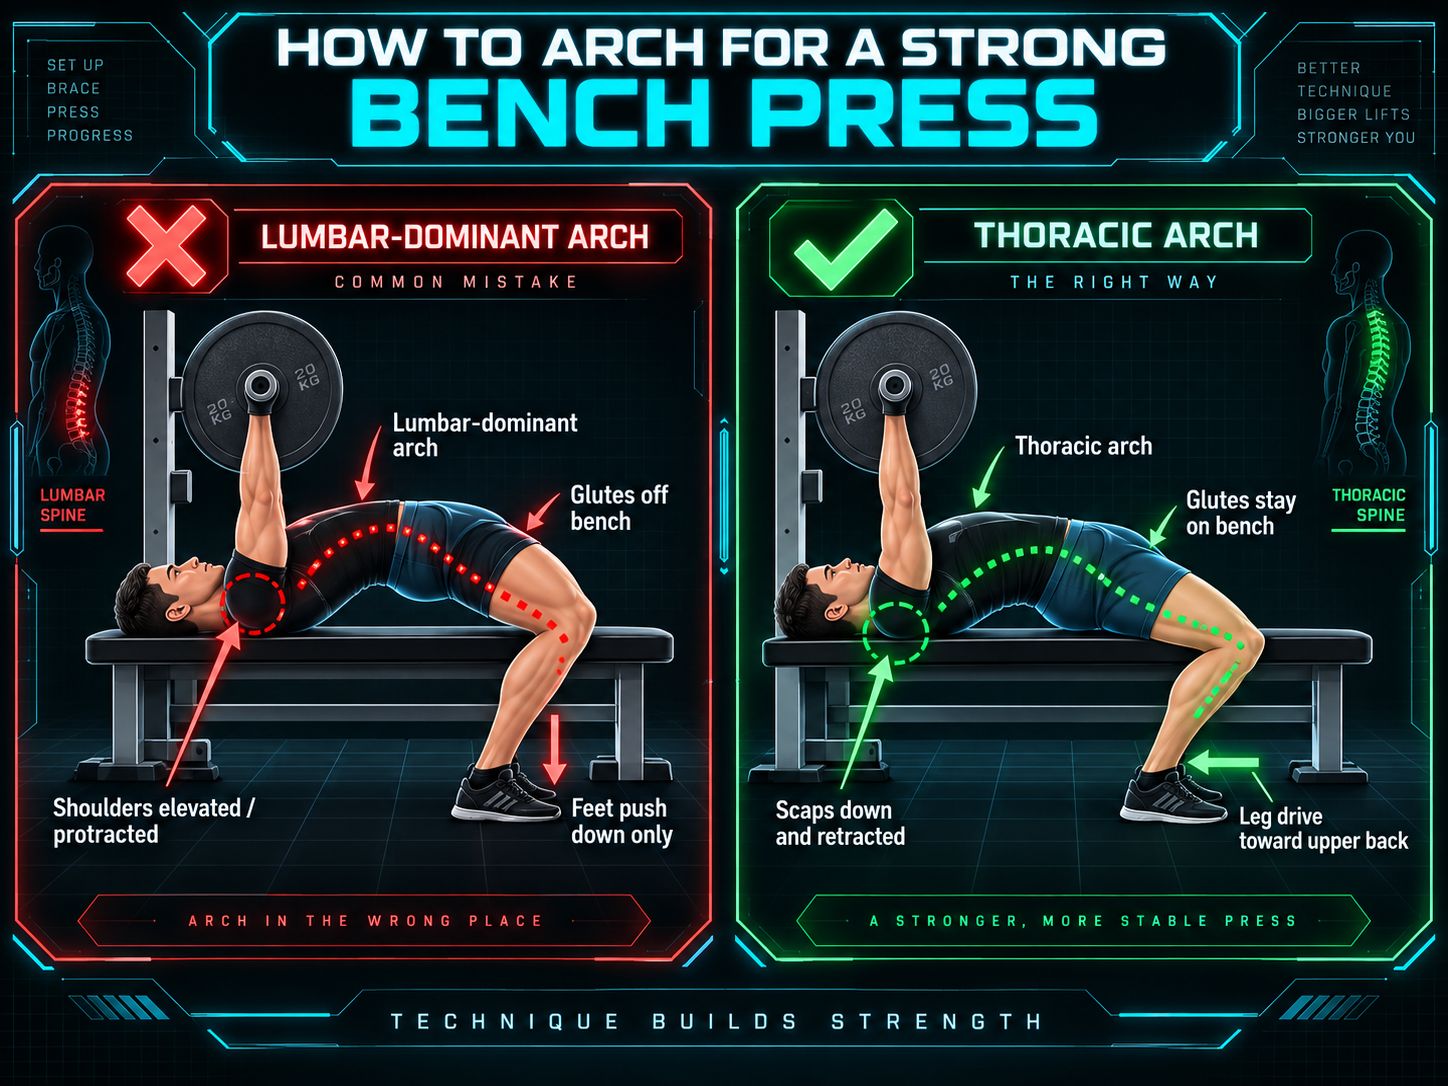
First, the anatomy. The bench press arch comes from two sources: thoracic extension (the mid-to-upper back arching) and scapular retraction and depression (the shoulder blades pulled together and downward, creating a stable shelf that the arch sits on). Most of the impressive arch you see in elite bench pressers comes from thoracic extension: the spine between the shoulder blades lengthening and extending backward. This reduces the distance the bar travels, elevates the chest toward the bar, and positions the shoulder joint for a safer, more mechanically advantageous bottom position.
The arch does not come from forcing the lumbar spine into a hyperextended bridge. That's a different movement pattern and, in excess, a different injury mechanism. If you can feel your arch primarily in your lower back, you're likely lumbar-dominant and not capturing the mechanical benefits of thoracic extension. If you feel it across your mid-back and chest (your chest feels elevated, your sternum is pointing toward the ceiling), that's the arch working correctly.
Building thoracic mobility. The method is simple, not quick.
Foam roller extensions: place a foam roller across your mid-thoracic spine (the area between your shoulder blades, roughly where a high-bar squat would sit). Let your head and hips drop back and downward over the roller. Hold this extension for 20 to 30 seconds. Move the roller two to three centimetres toward your neck and repeat. Two to three positions, daily. This mobilises the thoracic facet joints and builds extension range over weeks.
Thread-the-needle: start on hands and knees. Slide one arm underneath the body, rotating the thoracic spine until your shoulder and cheek touch the ground. Hold for 20 seconds each side. This improves thoracic rotation which is a prerequisite for thoracic extension.
The cue before lying down: "chest up." Stand before the bench, reach your arms overhead, and drive your chest upward before lying down. This primes thoracic extension before you even make contact with the bench. Maintain that chest elevation as you lower your back to the bench. Your shoulder blades will naturally retract and depress to create the shelf. Your arch is now set from thoracic extension, not lumbar compensation.
This is a months-long process. Start it today. Assess it in twelve weeks. The lifter who builds thoracic mobility systematically over a year of consistent daily work will have an arch that no amount of forcing will produce in a session.
Shoulder Packing: The Foundation of Force
Every advanced technique in the bench press is built on shoulder packing. Without it, every other element suffers. With it, the shoulder joint is protected, the pressing base is rigid, and the force transfer from body to bar is complete.
Shoulder packing has two components. They're not the same thing, and both must be present simultaneously.
Scapular retraction: pulling the shoulder blades toward the spine. The common cue is "squeeze your shoulder blades together." This is adequate for beginners. For advanced lifters, the cue should be more precise: "drive your elbows toward each other behind your back." This engages the lower trapezius and rhomboids simultaneously and creates a more complete retraction than a generalised squeeze.
Scapular depression: pulling the shoulder blades downward, away from the ears. This component is consistently undertrained and frequently missing even in experienced lifters. The cue: "pull your shoulder blades into your back pockets." The depression closes the subacromial space from below (rotating the acromion up and back) and creates maximum clearance for the humeral head. Without depression, even full retraction leaves the shoulder joint vulnerable to impingement under heavy load.
Together, retraction and depression create a rigid, elevated shelf across the upper back. This shelf is the mechanical base through which the entire pressing force is transmitted. When you lose this position, when the shoulder blades shrug forward and the depression gives way to a shoulder rise under load, the shelf collapses and force transmission to the bench is interrupted. The press becomes isolated to the chest and shoulders without the back transferring force from the legs. You have disconnected the chain.
Practise shoulder packing before every set, every session, at every weight. The warm-up sets are practice. The pattern of setting the shoulder blades must be as automatic as breathing by the time you're under near-maximal loads, because under those loads, cognitive bandwidth is minimal. The setup must run on autopilot, and autopilot is built through thousands of correct repetitions.
The test: set your shoulder blades on the bench, take the bar, and ask someone to press down on your front deltoids with moderate pressure. Your shoulder position should not change. If the shoulder blades slide forward under that pressure, your packing is not locked. Practise holding the position under external resistance and your packing under bar load will become more stable.
Precise Elbow Tuck: Beyond the 45-Degree Cue
The 45-degree elbow angle is a reference, not a prescription. It's a useful starting point for intermediate lifters learning the concept of elbow tuck. Advanced lifters need to understand the mechanism, not the number.
The mechanism of elbow tuck is lat activation. The latissimus dorsi originates from the lower and mid-spine and inserts into the upper arm. When the lat contracts, it pulls the upper arm downward and inward, toward the hip. Under the bench press, this action produces the elbow tuck automatically. The lat is not thinking about degrees. The lat is pulling the elbow toward the hip, and the angle that results is whatever the lat produces given the lifter's anatomy, grip width, and bar position.
Conscious lat engagement during both the descent and the ascent separates elite bench pressers from intermediate ones.
During the descent: as you lower the bar, actively drive your elbows toward your hips using your lats. This produces the tuck, guides the bar toward the lower chest (away from the face), and keeps the shoulder joint in the mechanically safe horizontal abduction range. Under heavy loads, this lat engagement also contributes to slowing the descent in a controlled manner: the lats are eccentrically loading as the elbows move away from the hips.
During the ascent: maintain lat tension through the press. The common error is that lifters who successfully achieve lat engagement on the descent lose it immediately as the press begins. The elbows flare as the bar rises. The bar drifts forward. The lockout fails mechanically. The lat must stay engaged from unrack to re-rack.
The training drill for lat engagement: Perform five sets of three reps on the bench at 50 percent of your working weight with one explicit focus: make the lat, not willpower or conscious elbow-tucking, the primary agent of elbow control. Between sets, perform three band lat pulldowns, squeezing the lat fully at the bottom. The neural priming from the pulldown makes the lat engagement during the bench press immediately more accessible. Build this priming pattern as a pre-bench ritual.
Competition Pause Timing: The Art of Stillness
The pause command in competition bench press is given by the lift judge when the bar is motionless on the chest and the lifter is in demonstrable control, not on a clock. For competition preparation, that means the skill being tested is "achieve and demonstrate absolute stillness," not "hold for one second."
What absolute stillness requires is control of the bar throughout the descent, not just at the moment of contact. A bar that descends quickly and crashes into the chest creates oscillation that takes time to dampen. The bar continues to move after contact. The judge sees motion. The press command is delayed or, at worst, the judge judges the pause as insufficient. A bar that descends with full control, decelerating progressively through the final few centimetres, arrives at contact with minimal oscillation and achieves stillness immediately.
Competition pause training is therefore "control the entire descent, arrive gently, and own the stillness instantly."
Train it year-round, not periodically. The integration of paused bench into the training programme should be constant and phased by intensity.
At 60 to 70 percent of working weight: this is a technique drill. Three-second deliberate pauses. Full stillness. The emphasis is on ingraining the pattern of controlled descent and instant stillness. Volume is moderate: four to five sets of three to four reps.
At 75 to 85 percent of working weight: this is a strength expression. One-second pauses at competition tempo. The emphasis is on maintaining the technical standard under real load. This is the intensity range where competition readiness is built. Two to three sets of two to three reps.
At 87.5 to 92.5 percent of working weight: paused singles and doubles that replicate competition conditions. These are used in the final preparation block, once per week at most. The nervous system cost is significant. Maintain the technical standard despite the load.
The judge's perspective matters for competition preparation. Position your training partner at the foot of the bench during paused sets and instruct them to play judge: they give the press command when they see genuine stillness, not on a count or a clock. This replicates the actual competition dynamic and develops the lifter's awareness of what "real stillness" looks like from the outside.
Touch Point Optimisation: A 5–10kg Adjustment
The touch point (where on your chest the bar makes contact) is determined by your anatomy, your grip width, your arch, and your bar path, not by convention. Within those constraints, a 1 to 2 centimetre adjustment can be worth 5 to 10 kilograms on a competition attempt.
The optimal touch point is the one where the transition from descent to ascent is smoothest, where the bar arrives at contact and the reversal feels immediate and powerful, not delayed and grinding. Below the optimal point, the shoulder is at an awkward angle and the pec is insufficiently loaded. Above the optimal point, the shoulder impingement risk increases and the anterior deltoid is overloaded.
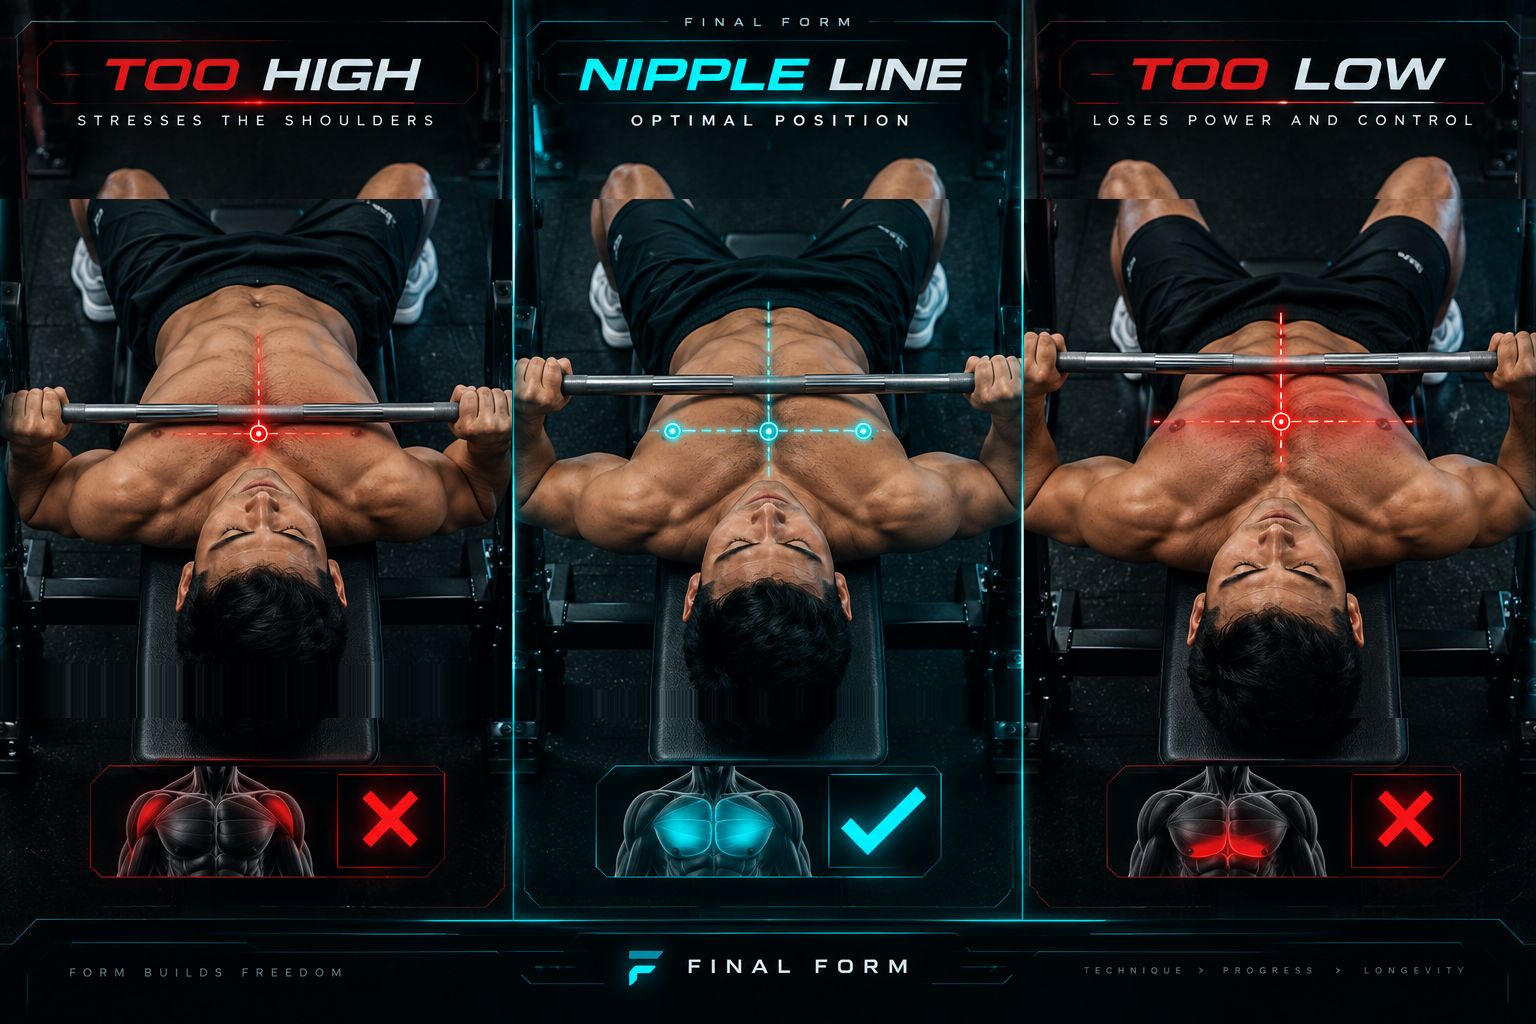
The way to find it is systematic experimentation during a dedicated training block. Choose a moderate intensity: 75 to 80 percent of working weight. Perform sets of three reps at three different touch points: your current standard position, 1 to 2 centimetres higher, and 1 to 2 centimetres lower. Film each set from the side. Observe the transition. Feel the difference in how the reversal initiates. The position where the reversal feels smoothest and most powerful is your optimal touch point.
Once identified, make it standard. Memorise the feel. Replicate it on every rep in training. By the time you're peaking for competition, the touch point should be as ingrained as the unrack: a fixed element in a system where every variable is controlled.
Specialty Work: The Tools That Build the Gaps
The bench press itself is the primary developer of bench press strength. But the bench press, performed in the same way with the same parameters indefinitely, will eventually stop producing adaptation. Specialty work addresses specific weaknesses and provides training stimuli the standard bench press cannot.
Board presses. A training partner places a wooden board (or several boards stacked) on the chest, reducing the range of motion of the press. The bar touches the board rather than the chest. This allows supramaximal loading of the top portion of the press (the tricep-dominant range) with weights that would be impossible to press through a full range of motion. Board presses are effective for overloading the lockout, building tricep strength, and providing a heavy loading stimulus without the full joint stress of a complete bench press. Use them in blocks specifically targeting lockout weakness. Three to four sets of two to three reps at 90 to 105 percent of your standard working weight.
Floor press. The floor press removes two variables from the bench press: leg drive and the bottom portion of the range of motion. Because the upper arms contact the floor at the bottom, the range of motion is limited to the top portion of the press. With the lifter on the floor rather than a bench, the leg drive chain disconnects. The floor press is honest pressing strength from a dead stop at the bottom. It exposes setup dependencies ruthlessly. A lifter who is significantly weaker on the floor press than on the bench press relative to each other is relying heavily on leg drive and arch, which is not necessarily wrong, but worth knowing. Floor press at 75 to 85 percent of your bench press for three to four sets of four to six reps.
Slingshot. The slingshot is a rubber resistance device that wraps around the elbows and assists the bar out of the bottom position by storing elastic energy in the material as you descend and releasing it as you press. It allows supramaximal overload: pressing loads beyond your raw maximum, which teaches the nervous system, the body, and the connective tissue what heavier weights feel like. It also exaggerates the bar path cue, as the slingshot naturally guides the elbows into a tucked position under its resistance. Use for one to two sessions per month at 102 to 110 percent of your working weight, as a tool for specific adaptation rather than a crutch.
Mental Preparation: Controlled Intensity
The mental state for a maximum bench press attempt is neither rage nor calm. It's controlled intensity: a precise neurological state that produces maximum force output while maintaining the precision of movement that the skill requires.
Physiologically, this state corresponds to optimal sympathetic nervous system activation. Too little activation (insufficient adrenaline, inadequate cortical arousal) produces submaximal force output. The lift feels heavy and slow. The mental engagement is insufficient. Too much activation (excess cortisol, over-arousal, tunnel vision) degrades motor pattern precision. The lift is attempted with maximum force but the technique breaks down under the anxiety. The bar path drifts. The setup is rushed. The pause is sloppy.
The optimal state is what performance psychologists call the Individual Zone of Optimal Functioning: a unique arousal level for each lifter that produces their best performance. You need to find yours and build a consistent pre-lift ritual that takes you there reliably.
The ritual should be short, two to three minutes maximum. It should include physical elements (chalk application, grip check, breathing pattern) and mental elements (a focus cue, a visualisation of the lift, a consistent activation phrase if one works for you). The physical elements perform the setup. The mental elements take you to the state. Executed identically before every heavy attempt in training, the ritual becomes a reliable on-ramp to your optimal performance state.
Before a competition attempt, don't change the ritual. The competition environment provides more than enough additional arousal stimulus. Your job is not to pump yourself up beyond your optimal state. Use the ritual to find the same state you find every training session, in an environment that's louder and more stressful than the gym. The ritual is your anchor. Practise it as deliberately as you practise the press.
Key Takeaways
Advanced arch development comes from consistent thoracic mobility work over months, not session-to-session forcing. Build it correctly and it develops permanently.
Shoulder packing requires both scapular retraction and scapular depression simultaneously. Most lifters have the retraction without the depression, leaving the shoulder unprotected.
Lat activation is the mechanism of elbow tuck, not the 45-degree angle, not conscious elbow control. Engage the lats, and the tuck follows automatically.
Competition pause is a skill of stillness and control, not duration. Train it year-round across three intensity zones to be competition-ready at all times.
Specialty work (boards, floor press, slingshot) addresses specific mechanical gaps that standard bench press cannot fully develop.
Put It Into Practice
This week: Add thoracic mobility work to your daily routine: two minutes of foam roller mid-thoracic extension before every pressing session. This is the beginning of a months-long arch development process. Start now.
This training block: Introduce one specialty movement per four-week block, deliberately chosen to address your identified weakness. Lockout failure: add board presses. Bottom weakness: add floor press. Bar path: use slingshot for one session per month. Build systematically; don't rotate through all three simultaneously.
Long term: Develop a competition-day ritual during training, not in the week before the meet. Apply it before every heavy single in training. Refine it until it's reliable. Arrive at competition day with a ritual that has already worked dozens of times under pressure, not one you're performing for the first time when it matters most.
Analysed by FINAL FORM AI. Your form, perfected.
References
- 1Elliott BC, Wilson GJ, Kerr GK. 'A biomechanical analysis of the sticking region in the bench press.' Med Sci Sports Exerc. 1989. PMID: 2779404
- 2van den Tillaar R, Ettema G. 'The "sticking period" in a maximum bench press.' J Sports Sci. 2010. PMID: 20373201
- 3van den Tillaar R, Ettema G. 'A comparison of successful and unsuccessful attempts in maximal bench pressing.' Med Sci Sports Exerc. 2009. PMID: 19812510
- 4Gomo O, van den Tillaar R. 'The effects of grip width on sticking region in bench press.' J Sports Sci. 2016. PMID: 26055260
- 5Lehman GJ. 'The influence of grip width and forearm pronation/supination on upper-body myoelectric activity during the flat bench press.' J Strength Cond Res. 2005. PMID: 16095407
- 6Saeterbakken AH, Mo DA, Scott S, et al.. 'The effects of bench press variations in competitive athletes on muscle activity and performance.' J Hum Kinet. 2017. PMID: 28713459