Common Bench Press Faults & How to Fix Them
The most frequent technique errors that cap your bench — and how to eliminate them.
By Dhiren Dunraj MSc

Key Insight
“The bench press breaks down in predictable ways. Once you know what to look for, the faults are obvious, and every single one of them is fixable.”
The bench press breaks down in predictable ways. Once you know what to look for, the faults are as obvious as a red flag on a FINAL FORM analysis: the bar path deviation, the bar bounce off the chest, the glutes lifting off the bench. These are patterns that repeat across thousands of lifters, each with an identifiable root cause and a specific fix.
Diagnose yourself with this article. Film from the side and from the head of the bench. Watch the footage honestly. Find your fault. Then fix it.
This article presents the faults in the same order they appear in the lift: setup errors first, then descent faults, then press faults. Most lifters have one or two primary faults, not all eight. Find yours.
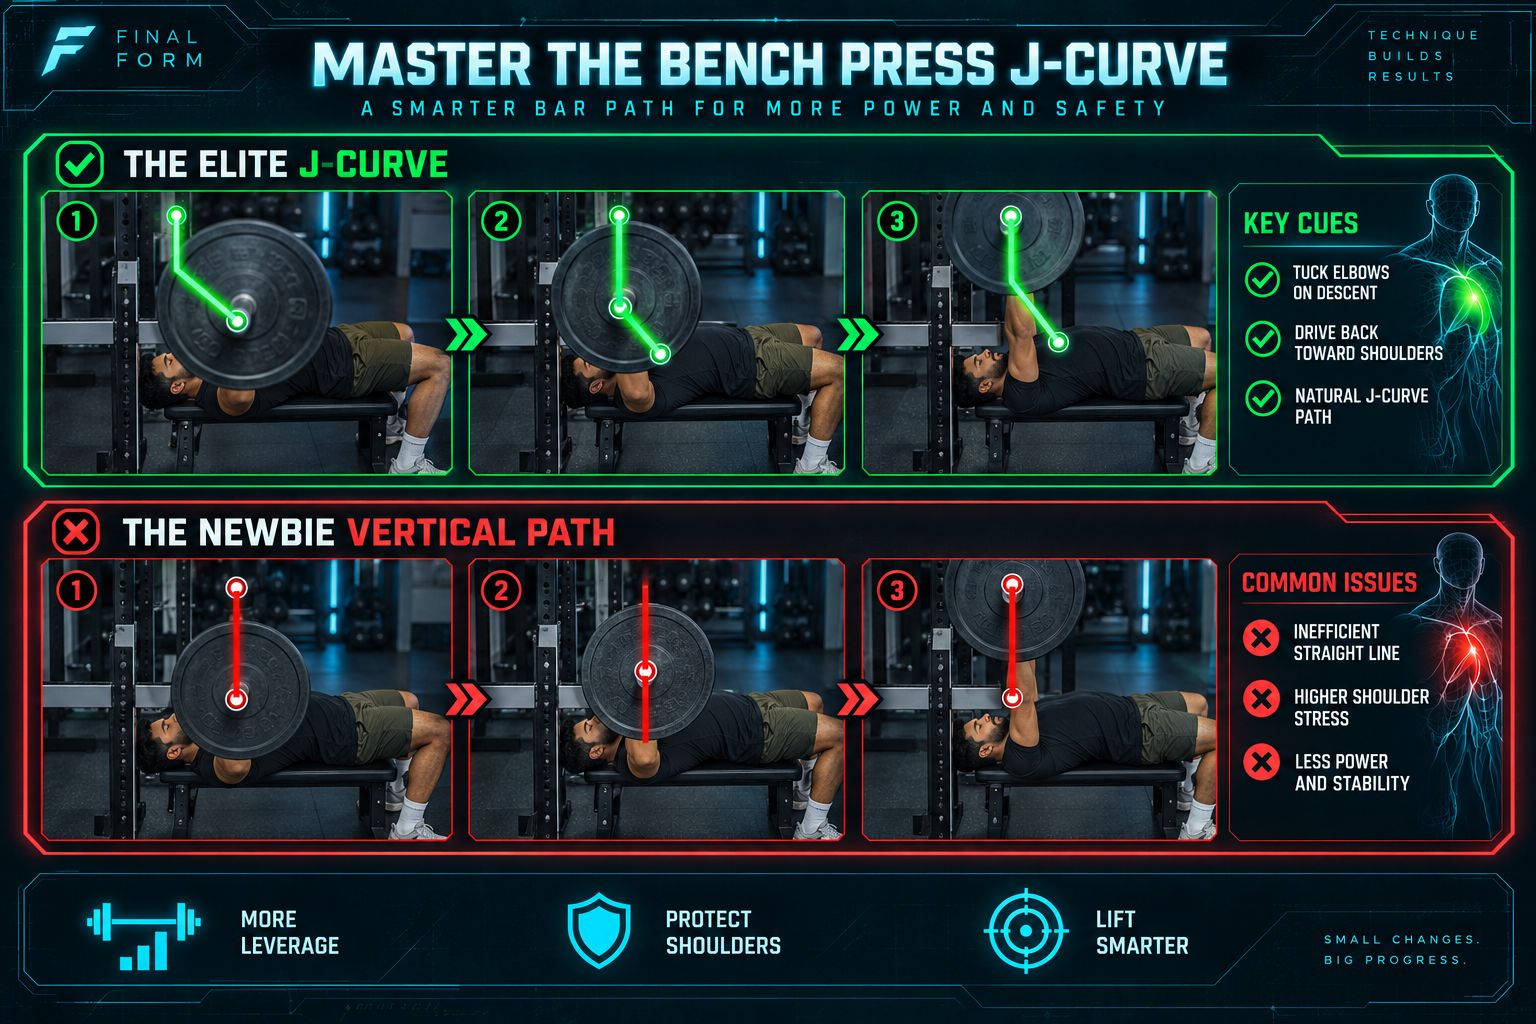
Fault 1: Bar Path Error — Bar Drifts Toward the Face at Lockout
The Fault: When filmed from the side, the bar at lockout is not over the shoulder joint. It has drifted past the shoulder toward the lifter's face. In some lifters this manifests as the bar visibly moving toward the head as they press. In others it's subtler: lockout looks achieved, but the bar is 5 to 10 centimetres too far forward of the shoulder joint. Either way, the moment arm at the shoulder joint has not collapsed at lockout.
The Cause: This is a bar path error caused by insufficient lat engagement during the descent and press. When the lats are not actively engaged, they provide no guidance for the bar's horizontal position. The bar descends toward the upper chest or throat rather than the lower chest. It rises from that higher touch point directly upward, arriving at a lockout position that's over the face rather than over the shoulder.
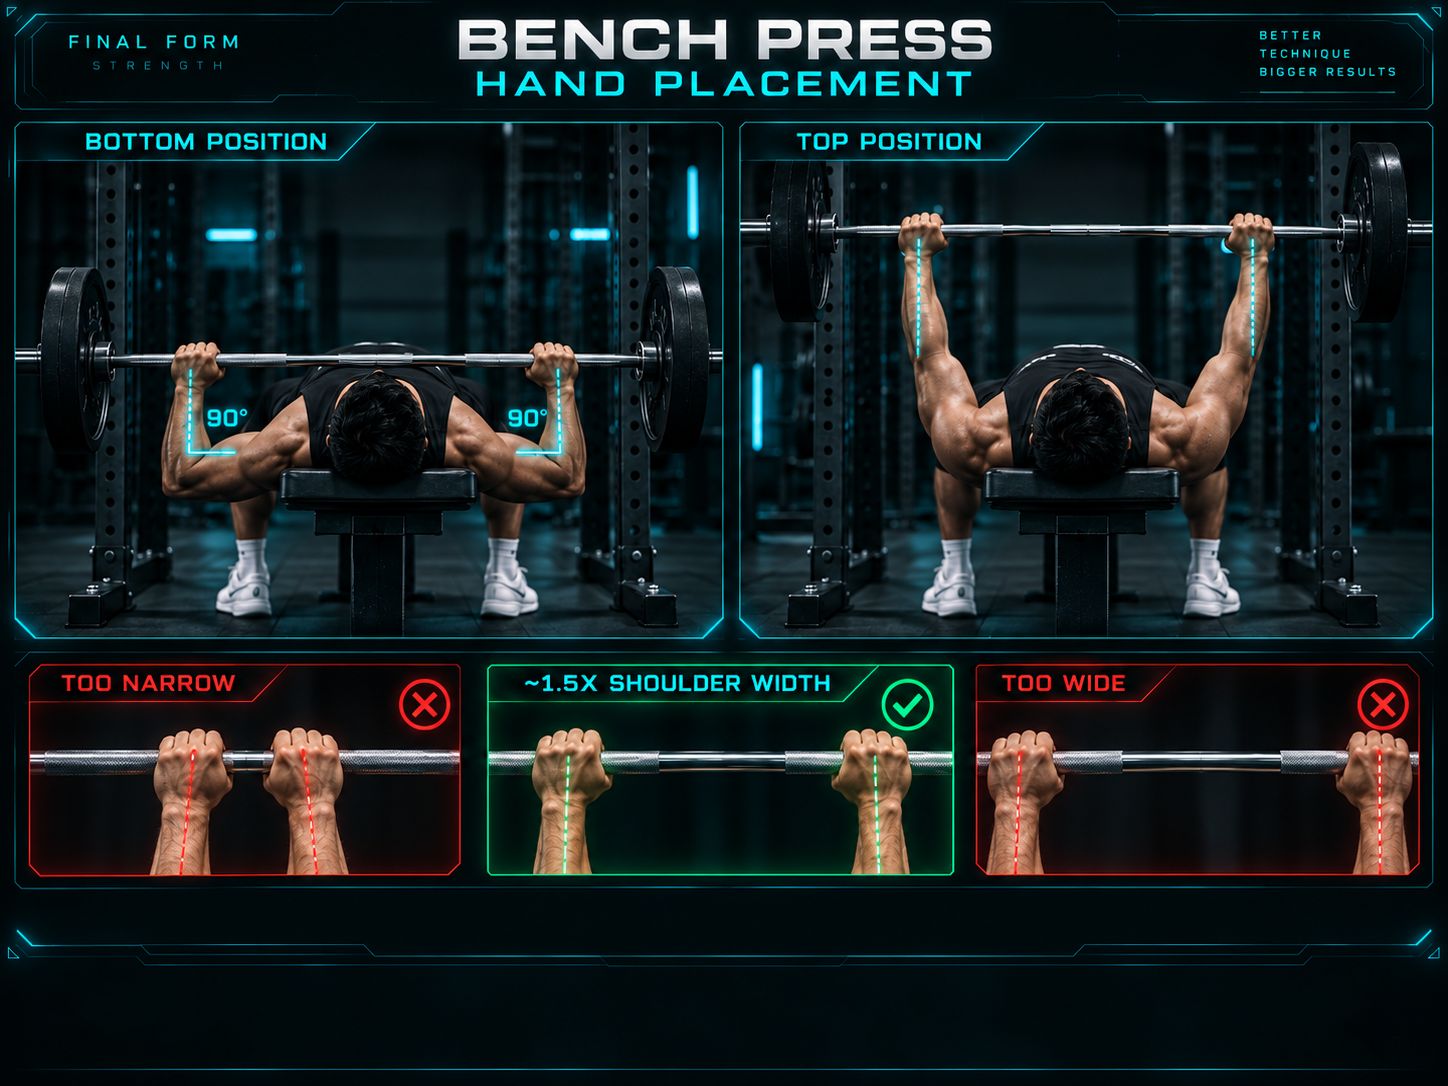
A secondary cause is a grip that's too wide, which creates a bar path geometry that naturally drifts forward at lockout. Both causes produce the same outcome: the shoulder is still under load at the top of the press when it should be mechanically at rest.
The Fix: Engage your lats from the moment you unrack the bar. The cue is: "push the bar toward your feet with your lats." You're not literally moving the bar toward your feet. You're activating the lat by imagining that direction of force. When the lats contract, they pull the elbows inward and downward, guiding the bar toward the lower chest on the descent and back over the shoulder joint on the ascent. Film from the side after applying this cue and trace the bar path. If it now arrives at lockout over the shoulder joint, the cue is working.
The Drill: Perform five sets of five reps at 50 to 60 percent of your working weight, focusing exclusively on lat activation. Before each rep, actively contract your lats: imagine you're trying to crush a walnut in each armpit. Maintain that contraction through the entire rep. It's a pattern-grooving drill. Light weight, high precision.
Fault 2: Bar Path Error — Bar Drops Toward the Belly
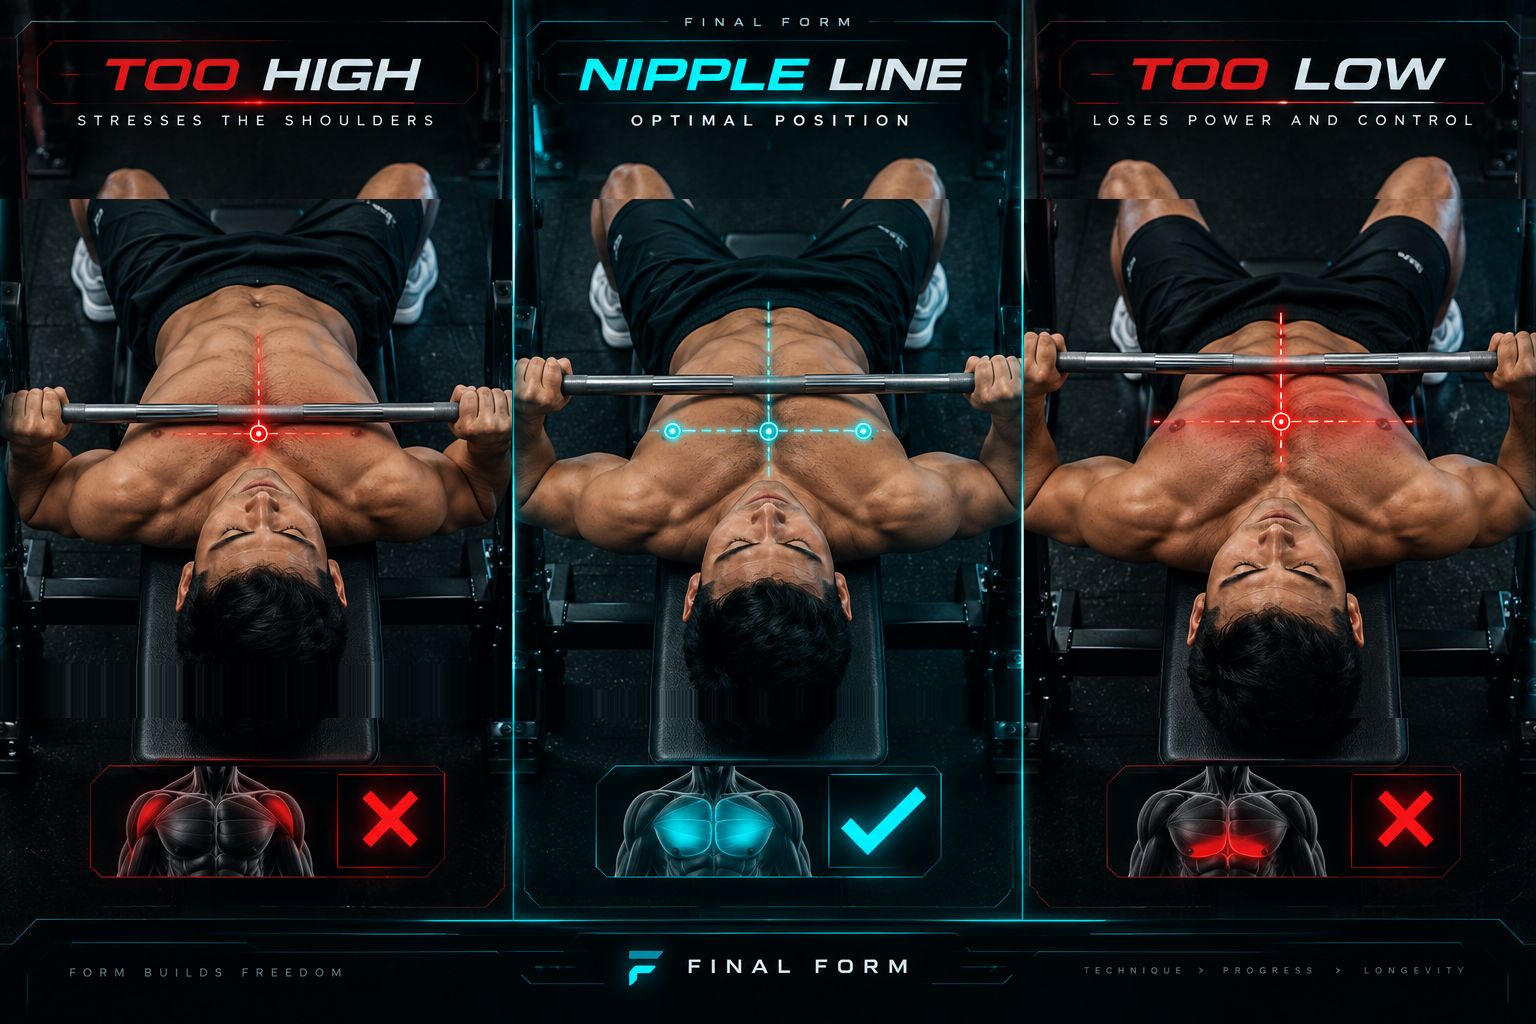
The Fault: When filmed from the side, the bar's touch point is too low on the torso, touching at the solar plexus or upper abdomen rather than the lower chest. This produces a descent that looks like the bar is travelling toward the floor rather than the chest. A press from that position requires the shoulders to work at an extremely unfavourable angle to get the bar back to lockout. The bottom position looks awkward and feels weak.
The Cause: This fault has two common root causes. The first is an excessively wide grip combined with a high touch point expectation: the lifter has been told to touch the lower chest but their grip width is pushing the natural touch point lower than intended. The second, and more common cause, is a misunderstanding of the arch. A lifter who has been told to use a strong arch but doesn't have the thoracic mobility for it attempts to create the arch by extending the lumbar spine excessively. This flattens the chest, pushes the touch point down, and produces the awkward lower belly contact.
The Fix: Identify which cause applies. Check your grip width first. If it's very wide (pinkies significantly outside the ring markings), narrow it by a few centimetres. Then check your arch: if your arch is primarily lumbar (lower back bridge) rather than thoracic (chest elevated), the fix is thoracic mobility work, not a grip adjustment. Lie flat on the bench, retract and depress your shoulder blades, and let your natural thoracic spine position determine where your chest sits. That chest position determines where the touch point should be.
The Drill: Touch-point calibration sets. Set up with your standard grip. Perform controlled descents at 50 percent of your working weight, stopping short of touching and observing where the bar will naturally contact. Adjust your arch and grip until the natural touch point is at the lower chest, just below the nipple line for most anatomies. Mark that position in your mind and replicate it on every subsequent rep.
Fault 3: Wrist Breakdown
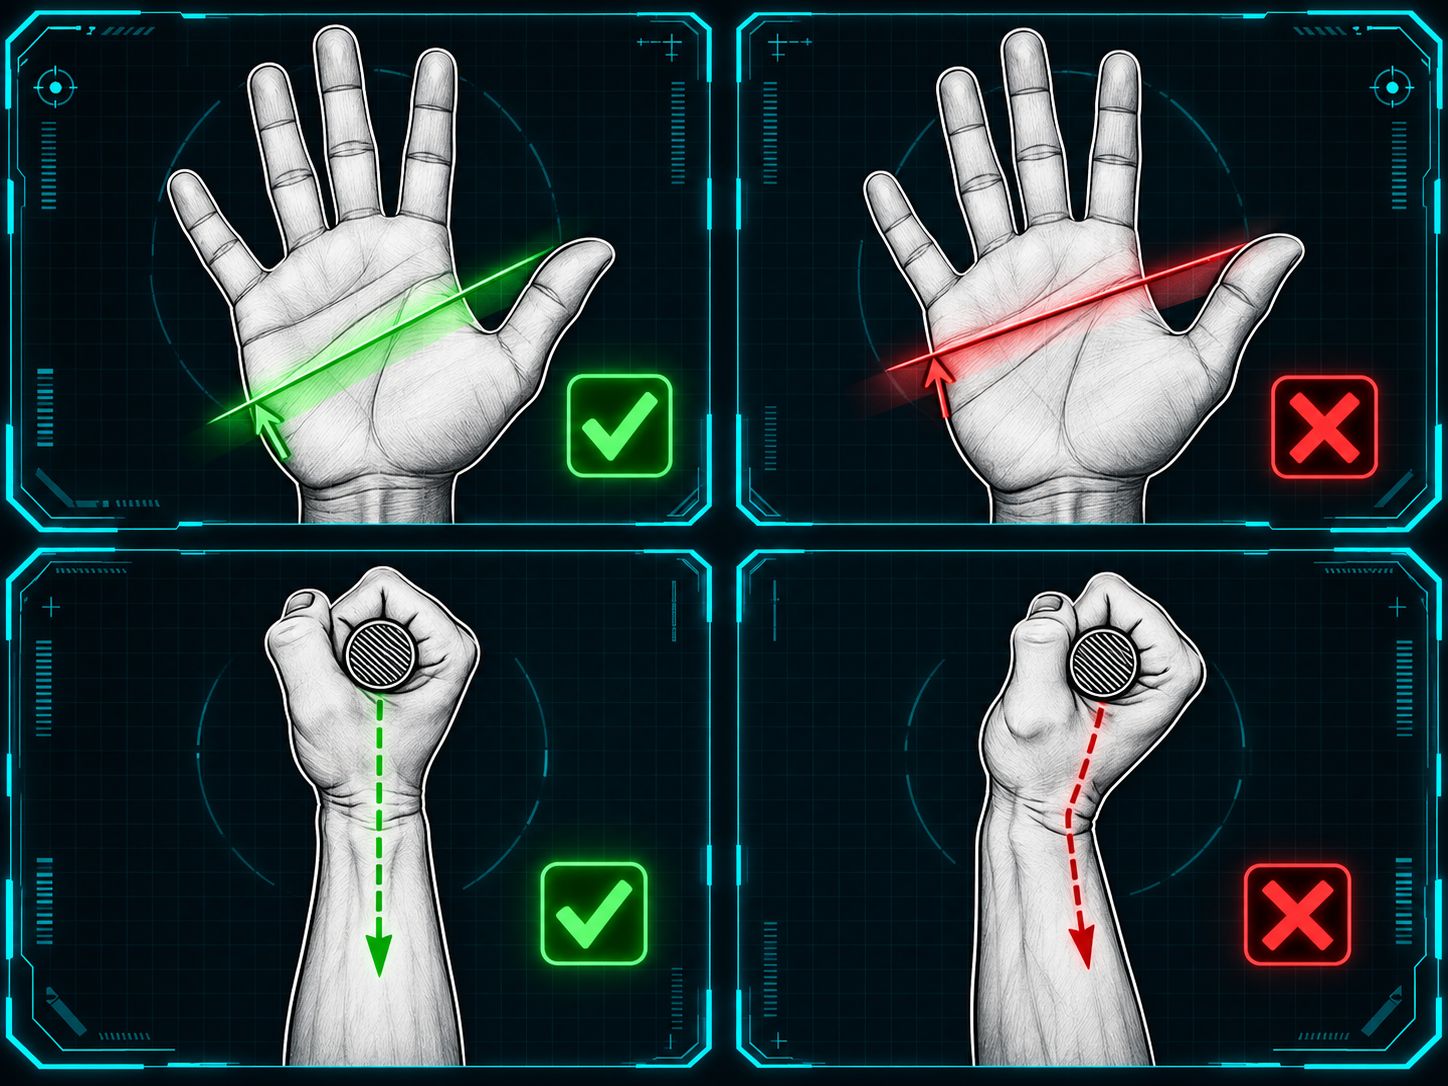
The Fault: Under load, the wrists bend backward: the bar rolls toward the fingers rather than sitting in the palm, and the wrists hyperextend. When filmed from the side, the wrist angle opens. Instead of the forearm and bar forming a straight line (or close to it), there is a visible backward bend at the wrist. The bar is no longer directly over the wrist joint.
The Cause: Wrist breakdown is a grip issue. The bar is too far forward in the hand, sitting across the fingers rather than seated in the heel of the palm, which creates a mechanical lever arm between the bar and the wrist joint. When load is applied, the bar's weight generates a bending moment that hyperextends the wrist. It's also, secondarily, a grip-strength issue: insufficient grip force allows the bar to shift within the hand.
This is dangerous. The wrist is being loaded in hyperextension under the weight of the bar. Over time, this accumulates. Acutely, under a heavy load, this can result in injury.
The Fix: The bar must sit in the heel of the palm: the area of the hand directly above the wrist joint, not across the fingers. The bar should contact the lower palm and the wrist should be in a neutral or very slightly extended position that's stable under load. Squeeze the bar hard. The cue is "bend the bar": imagine trying to bend the barbell in half across your grip. This full-grip activation drives the bar into the heel of the palm and locks the wrist.
The Drill: Grip calibration with an empty bar. Lie under the bar, set your grip with deliberate focus on bar position in the heel of the palm. Press ten reps with emphasis on squeeze and wrist neutrality. Then load to a light working weight and check whether the wrist position holds under load. If it still breaks, the bar is drifting back to the fingers during the unrack. Re-set the grip position before every set.
Fault 4: Elbow Flare
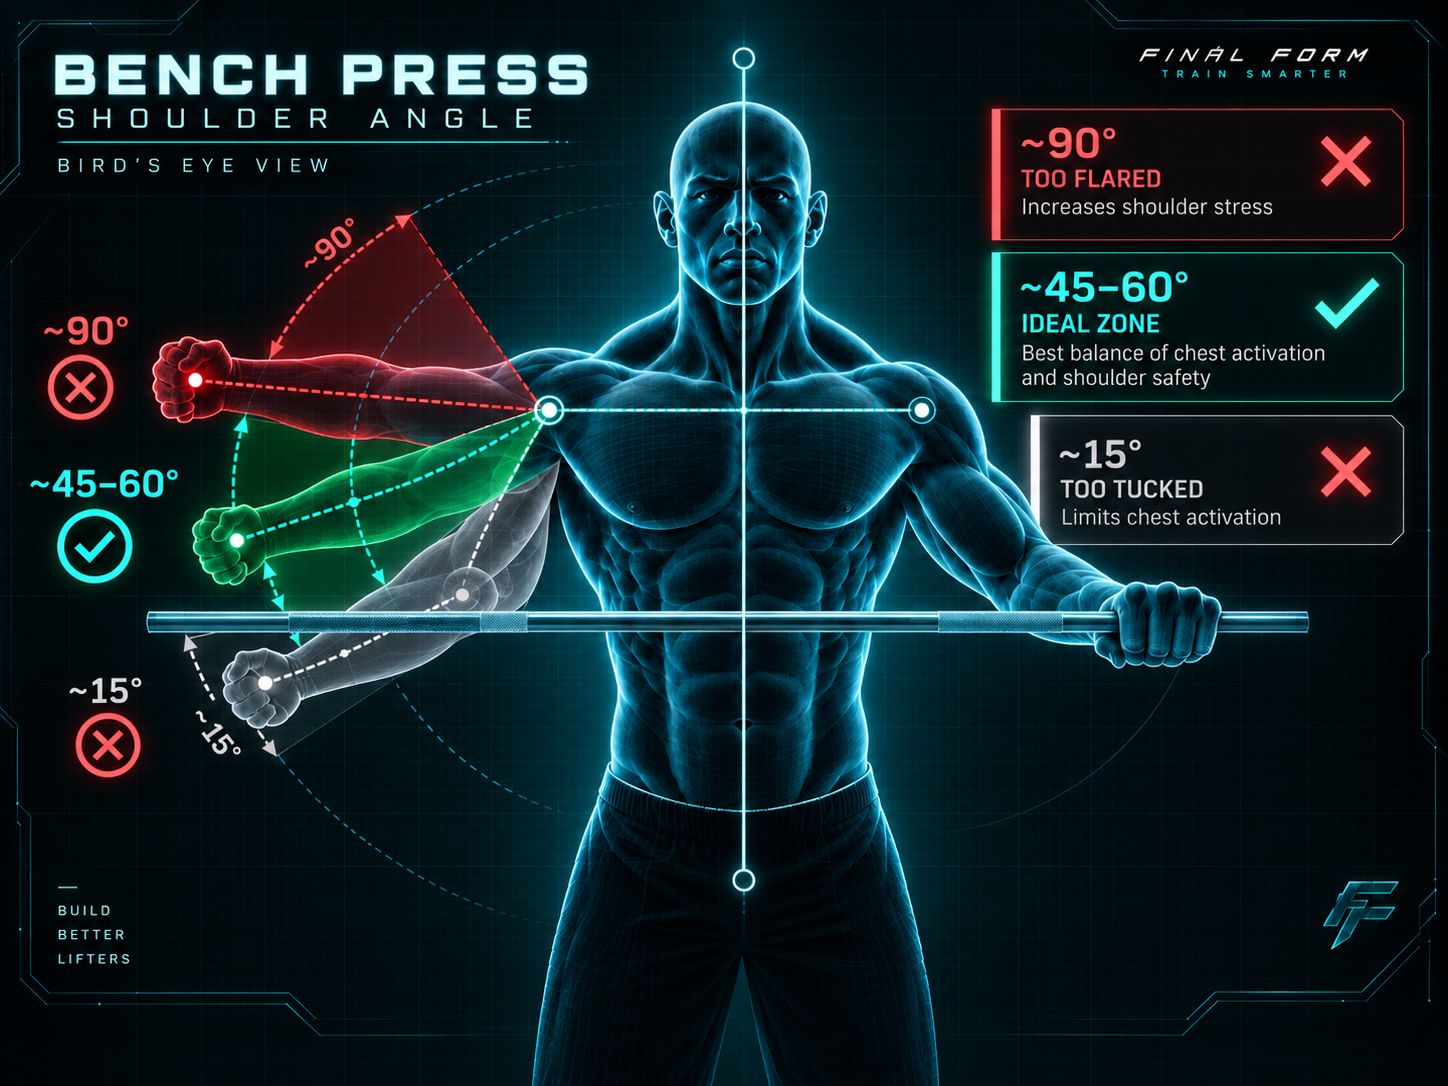
The Fault: When filmed from the head of the bench, the elbows track out: moving toward 90 degrees from the torso as the bar descends. In extreme cases the elbows are perpendicular to the body at the bottom, creating a straight line from elbow to elbow across the chest. This is the most common fault in recreational bench press and is commonly associated with anterior shoulder stress.
The Cause: Elbow flare is usually a misunderstanding of the bench press as a chest exercise. When a lifter thinks "chest exercise," they widen their grip and let the elbows track to 90 degrees because this feels like maximum pec stretch. It is. It also maximises anterior deltoid stress at the bottom of the lift and removes the protective mechanical advantage of the lat. Without lat engagement, the elbows have no active guidance and track to their anatomically lazy position: straight out.
The Fix: The cue is not "tuck your elbows." Consciously tucking the elbows during a heavy press requires cognitive attention that degrades under load. The cue is "engage your lats": specifically, imagine driving your elbows toward your hips. When the lats contract, they actively pull the upper arm inward and downward, bringing the elbows to approximately 45 to 60 degrees from the torso automatically. This is the mechanically optimal position. The lat, not the lifter's conscious will, is maintaining the tuck.
The Drill: Banded lat pulldown directly before bench press sets. Three sets of ten pulldowns, focusing on lat contraction. Then immediately bench press with the intention of recreating that lat contraction. The neural priming from the pulldown makes lat engagement during the bench press more accessible. Over time, the pattern becomes automatic.
Fault 5: Glute Rise
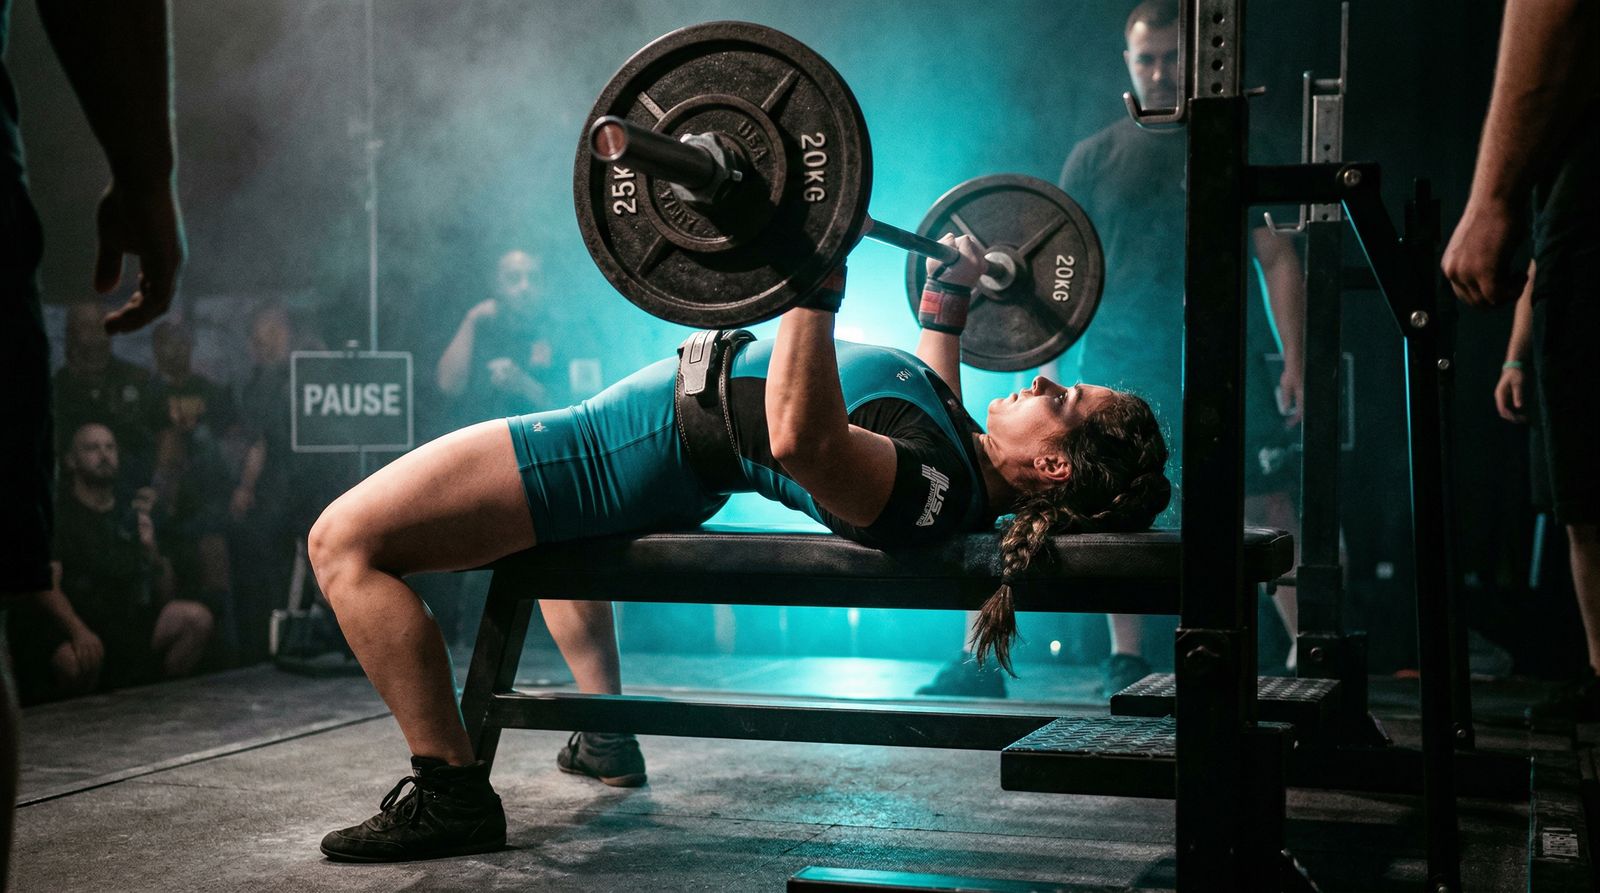
The Fault: During the press, typically at the moment of maximal effort, the hips lift off the bench. The glutes visibly rise, the lower back arches excessively, and the body essentially performs a hip extension during the press. In competition, this is a red light from every judge on the panel. In training, it eliminates the stable base and the force-transfer chain that leg drive is supposed to create.
The Cause: Glute rise happens when the lifter's intention is to "use leg drive" but the execution converts into hip extension. The force production is real: the lifter is driving powerfully with their legs. But instead of that force transmitting through the body to the bar, it's moving the body itself. The glutes leave the bench because the lifter's cue for leg drive is something like "drive your hips up" rather than "drive the floor down."
It can also occur when the feet are positioned directly under the hips (pulled far back) and the lifter lacks the hip flexor flexibility to maintain glute contact under that position. In this case, the hip extension is a mobility limitation rather than a cue problem.
The Fix: Change the cue completely, from "leg drive" to "push the floor away." The direction of force is downward, through your feet, into the immovable ground. When the floor is immovable and you drive into it, the force transmits upward through your pinned body to the bar. Your glutes contract in this process. They don't rise. The cue "push the floor away" makes the direction of force explicit and usually resolves glute rise immediately.
If the issue is a hip flexor mobility limitation from foot position, move the feet slightly further forward (enough that the glutes can remain on the bench comfortably) before applying the "push the floor away" cue.
The Drill: Glute-checked pause reps. Perform paused bench press with one training partner's hand placed lightly under your lower glutes. Their job is to tell you if they feel contact being lost, not to hold you down. Three sets of three paused reps at 70 percent of working weight. The tactile feedback is immediate and precise. Most lifters fix the fault within one session when given this cue.
Fault 6: Uneven Press
The Fault: When filmed from the head of the bench, one side of the bar rises faster than the other during the press. The bar tilts. In minor cases, the tilt self-corrects before lockout. In severe cases, the dominant side locks out while the weaker side is still ascending, creating significant rotational stress on the spine, shoulder joints, and wrists.
The Cause: Two distinct causes produce this fault and they require different fixes. The first is a strength asymmetry: one arm, shoulder, or pec is genuinely stronger than the other. This typically develops from years of unilateral bias in other activities, or from recovering from a previous injury that created protective compensation patterns. The second is a setup imbalance: the lifter is not centred on the bench, the bar is not gripped symmetrically, or the foot position creates a torso twist that biases one side of the press.
The Fix: Diagnose the cause first. Set up with deliberate bilateral symmetry: measure your hand position from the centre knurling, ensure your body is centred on the bench, and check that both feet are in mirror-image positions. If the press is still uneven after correcting setup, the cause is a strength asymmetry. The fix is unilateral pressing work: dumbbell bench press, where each arm is independently loaded and must independently complete the press. Perform dumbbell work at moderate intensity (3 to 4 sets of 8 to 12 reps) until the strength asymmetry resolves. Then return to the barbell.
The Drill: Single-arm dumbbell bench press. This isolates each limb completely and prevents the dominant side from compensating for the weaker. Start the weaker side first, complete all reps, then match the count on the stronger side. Over four to six weeks of consistent unilateral work, asymmetries measurable enough to affect the barbell press typically resolve.
Fault 7: Bar Bounce
The Fault: The bar descends quickly to the chest and bounces: the elastic rebound of the chest tissue and the reflex of the impact assist the initial drive off the bottom. When filmed from the side, the bar clearly decelerates sharply at contact (or doesn't, and just ricochets), and the first few centimetres of the press happen faster than any muscular contraction could account for. In competition, a bar that bounces before the press command is given is a red light. In training, it masks a genuine weakness.
The Cause: Bar bounce is a strength-avoidance pattern. The bottom position, the point of maximum load with the muscle at full stretch, is the hardest part of the press. Bar bounce bypasses this hard part by substituting elastic rebound energy for muscular force. The lifter never has to produce maximum force out of the bottom because the bounce does it. As a result, the actual strength at the bottom position never develops. Remove the bounce, and the lifter's actual press weight drops significantly.
The Fix: Reduce the load and develop genuine strength at the bottom position through controlled contact and paused work. The bar should touch the chest with controlled deceleration, arriving gently, not crashing. Touch-and-go, correctly executed, involves a controlled reversal that uses the stretch-shortening cycle minimally, not a bounce that uses impact force. Introduce a minimum of one paused bench press session per week at 60 to 75 percent of working weight. Build the habit of controlled descent and controlled initiation.
The Drill: The "feather touch" drill. Perform touch-and-go bench press with the explicit intention of making the bar's contact with your chest as quiet and gentle as possible. If you can hear the bar hit your chest from outside the gym, it's not gentle enough. Three sets of five reps at 65 percent. This forces deceleration control and eliminates the bounce as a mechanical option.
Fault 8: Failed Lockout — Sticking Point in the Top Third
The Fault: The press stalls somewhere in the top third of the range of motion, typically between mid-range and just below full lockout. The bar slows dramatically or stops. The lifter grinds. Sometimes they make it. Often they don't. When filmed from the side, the bar is visibly decelerating well before lockout. The lockout, if achieved, requires a second effort or a visible grind.
The Cause: Stalling in the top third of the press is almost always a tricep strength deficiency. At this point in the range of motion, the pectoralis major has transferred primary responsibility to the tricep brachii. If the tricep is the limiting factor, the handoff from pec to tricep is where the bar slows. This is the most common sticking point for intermediate bench pressers. Also check whether the bar path is contributing: a bar that has drifted toward the face at lockout re-introduces a shoulder moment arm that the shoulder must overcome. This can look like a lockout failure but is actually a path error. Check the bar path before assuming it's purely a tricep issue.
The Fix: For a genuine tricep deficiency: close-grip bench press, board presses targeting the top half of the movement, and overhead tricep extensions under load. Programme these as dedicated accessory work with progressive overload. For a bar path contribution: apply the lat engagement cue (see Fault 1) and ensure the bar is tracking back over the shoulder joint as it rises, not drifting forward. Both fixes may apply simultaneously.
The Drill: Close-grip bench press with a three-second pause in the top third of the range of motion. Position the bar approximately one-third of the way from lockout, pause deliberately, then press to lockout. Three to four sets of six to eight reps. This loads the tricep specifically through the range where the sticking point occurs and builds strength at the exact angle of failure.
Key Takeaways
- Every bench press fault has an identifiable root cause. Film yourself and diagnose before applying a fix
- Elbow flare is the most common fault and the most consistent predictor of shoulder injury. Fix it with lat engagement, not willpower
- Bar bounce masks a genuine bottom-position weakness. Reduce load and develop the strength you've been avoiding
- Glute rise is a cue problem, not a strength problem. "Push the floor away" resolves it faster than any strength work
- Uneven press requires a correct diagnosis: setup asymmetry first, then strength asymmetry if the setup is already balanced
Put It Into Practice
This week: Film your next bench session from two angles: the side and the head of the bench. Watch the footage without ego. Identify the one fault that appears most clearly and consistently. That's your priority.
This training block: Apply the drill for your identified fault every session for four weeks before reassessing. Don't try to fix all eight faults simultaneously. One fault, one fix, four weeks. Then film again.
Long term: Make two-angle filming a permanent part of your training. The faults that appear under moderate load often only become visible under heavier load. By the time you feel them, they've usually been there for months. The camera sees everything. Use it.
References
- 1Elliott BC, Wilson GJ, Kerr GK. 'A biomechanical analysis of the sticking region in the bench press.' Med Sci Sports Exerc. 1989. PMID: 2779404
- 2van den Tillaar R, Ettema G. 'The "sticking period" in a maximum bench press.' J Sports Sci. 2010. PMID: 20373201
- 3van den Tillaar R, Ettema G. 'A comparison of successful and unsuccessful attempts in maximal bench pressing.' Med Sci Sports Exerc. 2009. PMID: 19812510
- 4Gomo O, van den Tillaar R. 'The effects of grip width on sticking region in bench press.' J Sports Sci. 2016. PMID: 26055260
- 5Lehman GJ. 'The influence of grip width and forearm pronation/supination on upper-body myoelectric activity during the flat bench press.' J Strength Cond Res. 2005. PMID: 16095407
- 6Saeterbakken AH, Mo DA, Scott S, et al.. 'The effects of bench press variations in competitive athletes on muscle activity and performance.' J Hum Kinet. 2017. PMID: 28713459
Analysed by FINAL FORM AI. Your form, perfected.